Internal wastegates and exhaust flow options. - page 2 - IDI Engine - VWDiesel.net The IDI, TDI, and mTDI source.
-
#15 by TedV on 26 Jan, 2008 06:57
-
Quote from: "subsonic"
Since Jake is currently off line, does anyone know how his wategate setup worked?
if it was off his FSP Rabbit, like the post implies, then his waste gate would work like stock and he could not close the original opening in the turbo housing from the waste gate to the turbine exhaust.
What happens if you don't use a waste gate at all with a Giles pump? That would require the least amount of work. Didn't the GTD's run without a waste gate? -
#16 by subsonic on 26 Jan, 2008 13:35
-
It would seem kind of odd to have a wastegate open and have it dump out out two seperate locations.
The DP does not look very much like a custom fab piece. Perhaps it is and is was just done a long time ago. If it is a stock unit off of something, it would interesting to find out what it is from.
You can run with out a wastegate for sure. Im sure there are guys here who do. That would be the least amount of work. I plan on having one. I have ended up dumping WAY more money into this project than I had anticipated. When everything is all together and running, I plan on a very careful break in period. Boost and fuel will be going up in baby steps. I will eventually get it up to high performance stealth mode. I like to have a fall back or built in saftey position just to make sure.
When I jumped out of planes when I was in the service, the main chute was all I ever used. That was all I ever wanted to use. You can bet your ass though I always had my reserve strapped on. It's good to have a backup, just in case :wink:
I do not know about the GTD's wastegate setup. Perhaps someone else can chime in on that. -
#17 by 935racer on 27 Jan, 2008 11:10
-
That picture is a garret t3, stock one for these mk2's. I've done this a bunch of times, also routed it to the atmosphere instead of back into the downpipe.
All you need to do is remove that wastegate block off flange, make a hole the size of your tubing for the dump, weld up your dump tube, and than make a small block of plate and weld it into the turbine housing to completely divorce the wastegate stream from the downpipe stream. -
#18 by subsonic on 27 Jan, 2008 14:29
-
So says the man! Question answered

Thanks Dave. -
#19 by subsonic on 27 Jan, 2008 14:47
-
Quote from: "935racer"
I've done this a bunch of times, also routed it to the atmosphere instead of back into the downpipe.
All you need to do is remove that wastegate block off flange, make a hole the size of your tubing for the dump, weld up your dump tube, and than make a small block off plate and weld it into the turbine housing to completely divorce the wastegate stream from the downpipe stream.
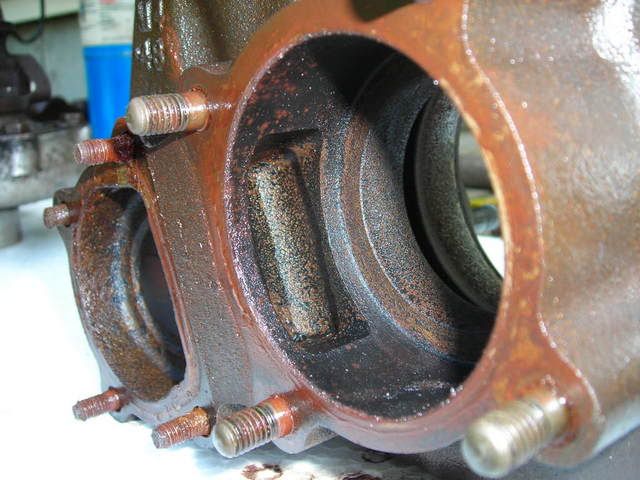
So here are some photo's of my turbine. Wastegate blockoff flange removed.
Where does the hole for the dump tube go? Is it in the original flange that gets removed?
Where does the block off plate go? Is it the slot that you can see in the 3rd picture? Any concerns about the block off plate weld in such a high heat area?
What the heck is that little hole in the turbine just under the wastegate valve?


-
#20 by 935racer on 27 Jan, 2008 15:16
-
You would put the hole either in the plate you removed or in custom plate if you choose to go that route. Welding cast material is fairly tricky and is best done by someone who is experienced in the procedure. I weld a lot of turbine housings, never had a problem, but there is a process that goes along with it to ensure reliability.
-
#21 by subsonic on 27 Jan, 2008 17:14
-
I was just asking so I could get the process figured out and visualize it in my head.
I have no idea how to weld. Me trying to do this would be a disaster :lol: Last time I was involved in welding I was helping a friend hold down a steel plate he was welding in place on a trailer. He was underneath, I was standing on top of the plate, pushing it down with my shoes. I was looking away so I would not go blind, drinking a beer. Bastard melted the sole of my boot and damn near set it on fire :shock: He started yelling when beer came dripping down between the plates as I dumped it all over my boot :lol: I will rely on the subject matter experts for welding right now, thank you very much :wink:
So when you block off the port that flows back into the main exhaust, are you doing it on both sides of the port opening? Wastegate and turbine side? There seems to be a few inches between the two. I am guessing that if you did not block off both ends you would have some pretty good turbulance. I am also guessing that if you blocked off the port opening in the turbine side, you would have a smoother (faster :twisted: ) flow of exhaust as it dumped into that sweet 3" stainless steel down pipe.
When you weld on the new dump tube, do you extend it through the plate and try and get it as close to the wastegate valve as you can, or do you leave it flush? Would it be better (if possible) to weld a connector pipe directly to the wastegate housing(inside it)? Something with a bolt pattern flange on the other end to connect the dump tube too? Would there be any benifit to that approach? Faster flow from not getting dumped into the old open section of the wastegate?
Last question :roll: he he
Why does a setup like this make the wastegate more accurate?
Corkey Bell writes:
"The value in creating a seperate tailpipe here is that it effectively increases the exhaust systems total flow area. In general, a wastegate will be more positive in response and somewhat more effective in controlling boost preasure when accompanied by it's own tailpipe."
I get the lower back preassure concept:
3"DP + 2" dump tube = 5"exhaust ,
,
The flow will have less turbulance, but why does the wastegate now perform it's role better? (And what the hell is that small hole under the wategate valve? :? ) -
#22 by subsonic on 28 Jan, 2008 09:42
-
Just read another interesting tidbit from Maximum Boost. Bell reccomended a turbo to manifold direct union, no gasket, if the metals are the same. Cast iron to cast iron. If both mating surfaces are milled perfectly flat and secured together with through bolts.
Thoughts on this? -
#23 by 935racer on 28 Jan, 2008 14:56
-
Quote from: "subsonic"
Just read another interesting tidbit from Maximum Boost. Bell reccomended a turbo to manifold direct union, no gasket, if the metals are the same. Cast iron to cast iron. If both mating surfaces are milled perfectly flat and secured together with through bolts.
Thoughts on this?
I mill them if they are out a bit, if I am in a pinch I use a gasket, never had any issues either way.
Yeah I usually weld both sides of the cross over port to reduce turbulence.
I weld the dump tube flush to the plate. There isn't any point in trying to get it close to the valve.
As for the small hole, don't know, where does it go?
The reason a divorced wastegate tube is better is that you eliminate the variable of pressure in your exhaust tract acting against the wastegate.
ie if you have a restrictive exhaust system the pressure in your exhaust could act against the wastegate tube and cause the wastegate gasses to back up and increase pressure which would make boost control a bit dicey.
If it is designed properly however you can actually get your exhaust system to scavenge from the wastegate. -
#24 by subsonic on 28 Jan, 2008 18:42
-
Quote from: "935racer"
If it is designed properly however you can actually get your exhaust system to scavenge from the wastegate.
Know anyone who might be up to building a properly designed system :wink:
I should have the ATP turbo mani and the turbo in the mail up to you in the next day or so. I am going by my friends shop to pick up the turbo. I dropped it off after dissasembly so he could glass bead everything. Wastegate and accuator were removed as well. Since he does valve work, he is going to clean up the wastegate valve and recut the seat for a perfect seal.
Gpopshop told me to go ahead and glass bead blast the actual comp and turbine blades with 60psi. Jeez that makes me nervous. They look so damn fragile!
I told him to give the turbine and compressor housings hell with the glass bead, so they should be compleatly stripped and clean when you get them. As a matter of fact, everything will be except the center housing. My bud does not want to glass bead it :? . He says that it is next to impossible to get all the residue out when you are finished, and he is afraid it will wreck the turbo. It's pretty clean as is. I have had it soaking for like a month in cleaner. Just wanted it super clean!
Since the turbo is going to be balanced, and the turbine housing is getting Ceramic coated inside and out, I am going to send it up to you dissasembled.
Do you want the ATP stripped as well? I did not know if you had to do this before the ceramic coating was applied.
If you feel like putting down some molten metal on both sides of the cross over port, I could sure go for the seperate dump tube setup :twisted: . What size dump tube do you reccomend? -
#25 by lord_verminaard on 29 Jan, 2008 09:25
-
Quote from: "subsonic"
I have not seen this type of down pipe before. Has anyone else? This is exactly what I was looking for. Proof it could be done. I dont need to have a converter on my exhaust, so I could just run a second pipe off the turbo, and just have it dump into the atmosphere a few feet away. Add a 2" pipe for the wastegate, man you would have 5" of exhaust coming off the turbo. Not much restriction there :lol:
How the hell do you redirect the wastegate flow out to the dump pipe???
Still looking for info on how to pull the actuator and wastegate for clean up, etc..
That looks like a "custom" modified pipe to me. I took apart a 1.6 T3 to figure out why the wastegate was sticking. I had pictures of it but I think they are gone now. I will try to describe it as best as I can. If you look at the "discharge" end of a VW T3, there is a plate with 4 bolts blocking the wastegate port, right next to the flange from the downpipe. You can simply remove this plate, and fab up a small 4-bolt flange to connect here to make your "dump tube". There is a small (very small!) passage from the wastegate dump to the main downpipe where in the OE configuration, the gasses from the wastegate join the exhaust from the turbine. This looks really restrictive to me and it can only help things by providing a free-flowing path for the gasses to escape. I wouldn't worry about sealing up the passage though, if any gasses go through it they will just join up with your downpipe. This was the plan on my TDI swap. The only reasoning I can think of to block off the wastegate dump in the OE configuration is because the wastegate valve is not a "flapper" like most newer turbos are, it is more like a valve in a cylinder head, so the gasses are not going to be coming out in a "straight through" path, so a need for the discharge being right in-line with the flow of the wastegate port is probably not as needed as it would be if it were a "flapper" type valve.
As for disassembly, try and work with me here, I will do the best I can to explain but it's hard without looking at it in front of me. On the top of the "can" of the wastegate, you can see the two pieces- the upper part fits inside of the lower part, and there is a small "lip" all around the inside of the can. If you look closely inside the lip, (there might be crud caked up in there, there was on mine) there is a big snap-ring looking thing. It's actually more like a piston ring, as it's spring-loaded and fits into a groove all around the inner part of the lower half of the can, holding the top part in place. If you look closely, there will be a taper on one end of the ring, small enough that it will take a pick or a very small, thin flat screwdriver to move it. Pull inwards on this taper, and the ring will slowly come out of the groove. Once the top is off, it's pretty straightforward. There is a nut on the top of the valve that releases the spring retainer/diaphragm assembly, (remember that 5mm hex on the bottom of the valve? You need to hold it on that end while you turn the nut on the top off) Be careful as it is under some spring pressure and it let go with a pretty good pop when I took mine apart.
Alas, the wastegate valve on mine is bent (someone must have dropped it) so I am going to see if a machine shop can straighten it, otherwise I'll probably need to find another turbo.
Hope this helps, sorry if I'm not real clear on my instructions.
Brendan -
#26 by subsonic on 29 Jan, 2008 10:07
-
Thats good stuff.
I did just that after I cleaned the top of the accuator off and saw the ring. I got it all apart a night ago. Having the valve and valve seat glass beaded and recut for a perfect seal. Will be having everything else cleaned and inspected.
I am positive you can pick up another valve if yours is bent. Is yours the flapper, or does it look like the one that is in the pictures up above?
Since I am going for a total rebuild I decided to have the studs replaced on the turbine housing. They were rusty and pitted. My friend got them all out except one. Thing snapped right off :x Had to drill it out and install a helicoil. Gonna have that area milled perfectly flat tonight.
I am wondering about going with stainlesss steel studs. I am worried about the cast iron expansion rate v.s the stainless rate. :?
Anyone go this route and have any thoughts they would like to share? -
#27 by lord_verminaard on 30 Jan, 2008 06:27
-
Yeah, mine looks like the one above, just like a valve in a cylinder head.
I'm also stuck on mine, the compressor housing came off just fine, but the turbine housing is stuck good. ALL of the turbine housing to center section bolts broke on mine, and now that they are all out, I cannot separate the center section and the turbine housing. There is no good place to pry or whack with a hammer.
Brendan -
#28 by TedV on 30 Jan, 2008 08:41
-
Quote from: "lord_verminaard"
On the top of the "can" of the wastegate, you can see the two pieces- the upper part fits inside of the lower part, and there is a small "lip" all around the inside of the can. If you look closely inside the lip, (there might be crud caked up in there, there was on mine) there is a big snap-ring looking thing. It's actually more like a piston ring, as it's spring-loaded and fits into a groove all around the inner part of the lower half of the can, holding the top part in place. If you look closely, there will be a taper on one end of the ring, small enough that it will take a pick or a very small, thin flat screwdriver to move it. Pull inwards on this taper, and the ring will slowly come out of the groove.
Brendan
Hmm could the early to mid-80's waste gates just be crimped? Mine does not have anything resembling the snap ring you desribe, just looks to be crimped. :? -
#29 by subsonic on 30 Jan, 2008 10:31
-
Mine came apart when I started hitting it with a 3 lb mallet. I hit it in between wacks with the propane until it was smoking and to hot to touch.