-
#45
by
Gizmoman
on 06 Dec, 2013 06:45
-
holy cow I missed a huge part. You said 1/8npt...the inlet for your rad is 3/4" so you should be using no less than 3/4 like 745 and those said. I thought you had 1/2"npt for some reason I read it wrong. I bet that will get you much cooler doing that this weekend. Now will it help egt or not is the next question.
Yea, see what I mean? - I wasn't thinking

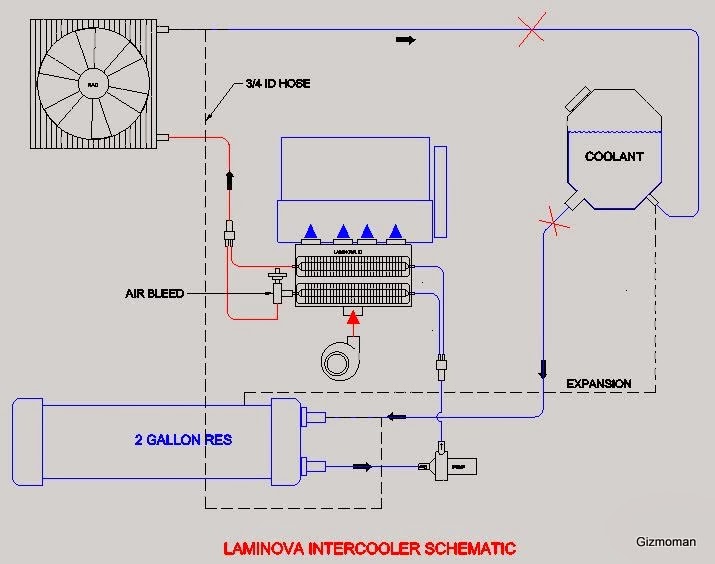
The coolant is in the IC way too long and the rad can't deal with the huge differential. The rad has one in and one out, the IC has two in, and two out, so I'll go 1/2" on all four. In my drawing (above) it shows 3/8 but I'll change it to 1/2..
I'd love to see EGT's never go over 1000 as it would help me get plenty of trouble free miles out of the engine. It won't do that without a higher flowing turbo I'm afraid. But if it just gets the EGT's to level off between 11-1300, it's better than the continual climb I'm getting now.
-
#46
by
745 turbogreasel
on 06 Dec, 2013 21:28
-
You might even want to drill the fittings a bit,
area of 2 half inch pipes is 0.392"square, while 3/4" is 0.442" square.
As you will have 4 of the slightly restrictive fittings, my calculator says you want 0.53"+.
-
#47
by
Gizmoman
on 06 Dec, 2013 21:41
-
Thanks for the calcs. They reference pipe, not fittings and "T" s which is what I will be running the coolant through. I get your meaning though, and will open them up if possible. There are restrictors in one end of each Laminova cooler tube - they are not removable without cutting them out. I believe they are there to force most of the flow through the small ports directly under the fins on the extrusion OD.
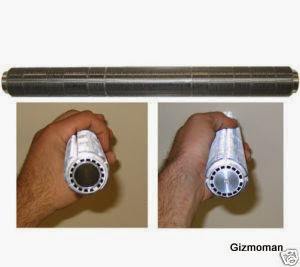
The picture shows one end nearly blanked out ,but there were three radial slots in mine. The water flows with the restrictors on the out-feed end. I truely think 1/2" would be all the fluid that could pass through the tube
-
#48
by
Gizmoman
on 08 Dec, 2013 08:31
-
Just an update. . .
I removed each cap and changed the ports from 1/8 to 1/2 NPT. The 1/8" fittings I removed had an ID of .21 and the new ones have a .56 ID. Remember, this is two in, two out and the IC rad is one in, one out so these should be more than enough volume.

The new fittings wouldn't spin due to the timing belt cover and I also needed more clearance to route the 3/4" ID hoses so I turned some adapters from aluminum.
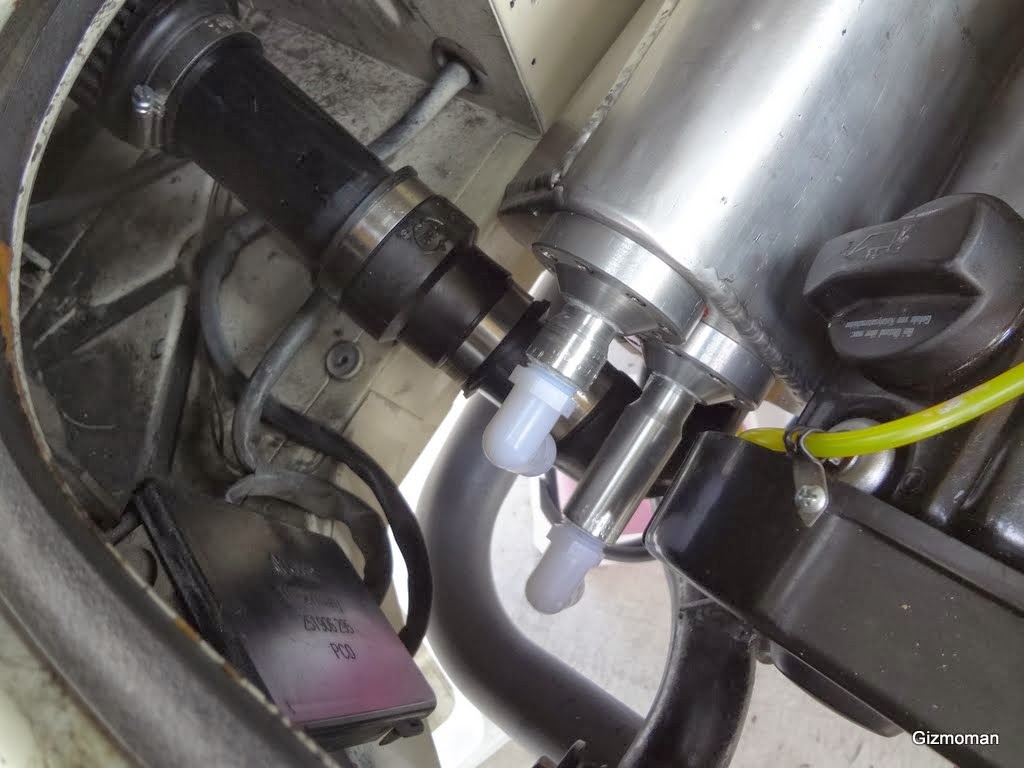
I also installed a vent port on the highest part of the system to bleed the air out.
I'm a bit concerned with the nylon fittings as they are only rated to 200F. I hope to stay well below that but we'll see.
Today I will replace all the hoses in the system with new 3/4 ID hose. Currently they are 1/2" and have "T"'s splitting to the 1/4" lines that went to the tiny fittings I was using - again seems pretty silly of me to use those fittings in the first place. Hopefully I'll have it done in time for a test drive before the sun goes down.
-
#49
by
theman53
on 08 Dec, 2013 11:30
-
I have used the plastic fittings for a temporary in the actual coolant lines when I couldn't get any other fittings and there were no hoses at the parts store. As soon as I got the right hose I took them out, so I have no idea how long they will work or if you should keep them. Maybe get some brass fittings and keep them with you just in case. This at least isn't as bad as the engine coolant system for making it home.
-
#50
by
745 turbogreasel
on 08 Dec, 2013 20:32
-
Those fittings come in a lot of veg conversion kits, and they can last quite awhile, but I have seen some get pretty misshapen even without an overheat.
they should be fine for some running around, but I would for sure change them out in the long run.
-
#51
by
Gizmoman
on 08 Dec, 2013 20:47
-
Those fittings come in a lot of veg conversion kits, and they can last quite awhile, but I have seen some get pretty misshapen even without an overheat.
they should be fine for some running around, but I would for sure change them out in the long run.
I have used the plastic fittings for a temporary in the actual coolant lines when I couldn't get any other fittings and there were no hoses at the parts store. As soon as I got the right hose I took them out, so I have no idea how long they will work or if you should keep them. Maybe get some brass fittings and keep them with you just in case. This at least isn't as bad as the engine coolant system for making it home.
Agreed, I'll hunt some brass ones down. Home Depot ain't what it used to be

I didn't get as far on it as I wanted spent the whole day just making the adapters. Re-routing the 1" OD hose is going a lot slower than I thought as well. The stuff is quite stiff when it's cold.
-
#52
by
theman53
on 08 Dec, 2013 20:51
-
I know how you feel. When the turbo blew up for the 2nd time on my car everything seemed to go at a slower pace. You will get it and it should be fine.
-
#53
by
745 turbogreasel
on 09 Dec, 2013 00:36
-
I've played that game before too.
Dunk them on a pot of boiled water for a minute prior to install.
-
#54
by
Gizmoman
on 09 Dec, 2013 05:44
-
Thanks for the advice, and yeah, I'm not all that thrilled about crawling around on my back under it - some more. Wish I had a lift.
I used a heat gun to get it on the fittings and to bend tighter coming off the "t"s. It looks a bit crappy and I may machine some custom splitters. I'm also thinking of re-plumbing it so the expansion tank is only that, and not part of the working system. The dashed lines represent the new configuration. The downside is that it removes the tank from my total volume as libby pointed out in another post.
The water rushing into the tank makes a bit of a racket - the tank is under the rear bench. My pump is one of these

5.2 GPM @ 5.3 PSI
I sure hope the larger hose and fittings cools off my IA considerably. I've decided that this is the last mod I am going to do.
-
#55
by
libbydiesel
on 09 Dec, 2013 09:31
-
You also want to plumb it so that any air will end up at the expansion tank. Otherwise purging may become a challenge.
-
#56
by
CrazyAndy
on 09 Dec, 2013 14:14
-
You also want to plumb it so that any air will end up at the expansion tank. Otherwise purging may become a challenge.
Agreed; make the expansion tank the highest point of the system instead. I've dealt with B5 Passats that like to get air in the heater cores due to the being the high point in the system instead of the expansion tank. Save yourself the hassle and make the expansion tank the high point and main filling reservoir.
-
#57
by
Gizmoman
on 09 Dec, 2013 16:39
-
You also want to plumb it so that any air will end up at the expansion tank. Otherwise purging may become a challenge.
Agreed; make the expansion tank the highest point of the system instead. I've dealt with B5 Passats that like to get air in the heater cores due to the being the high point in the system instead of the expansion tank. Save yourself the hassle and make the expansion tank the high point and main filling reservoir.
Understood, I have a bleeder on the highest fitting in the system and didn't seem to have any issues. The tank is under the rear seat. Not sure if t's higher but it must be or I wouldn't get water out of the bleeder (which I did after all the air came out). The tank is open to atmosphere and it stayed 1/2 full during my test runs.
-
#58
by
Gizmoman
on 15 Dec, 2013 05:59
-
In case anyone was wondering, no progress

I decided to not use the plastic fittings and have ordered brass (60 bucks worth!). The amount of effort routing the lines is not worth doing it twice.
I'll keep you posted.
-
#59
by
Gizmoman
on 16 Dec, 2013 06:12
-
Just an update. . .
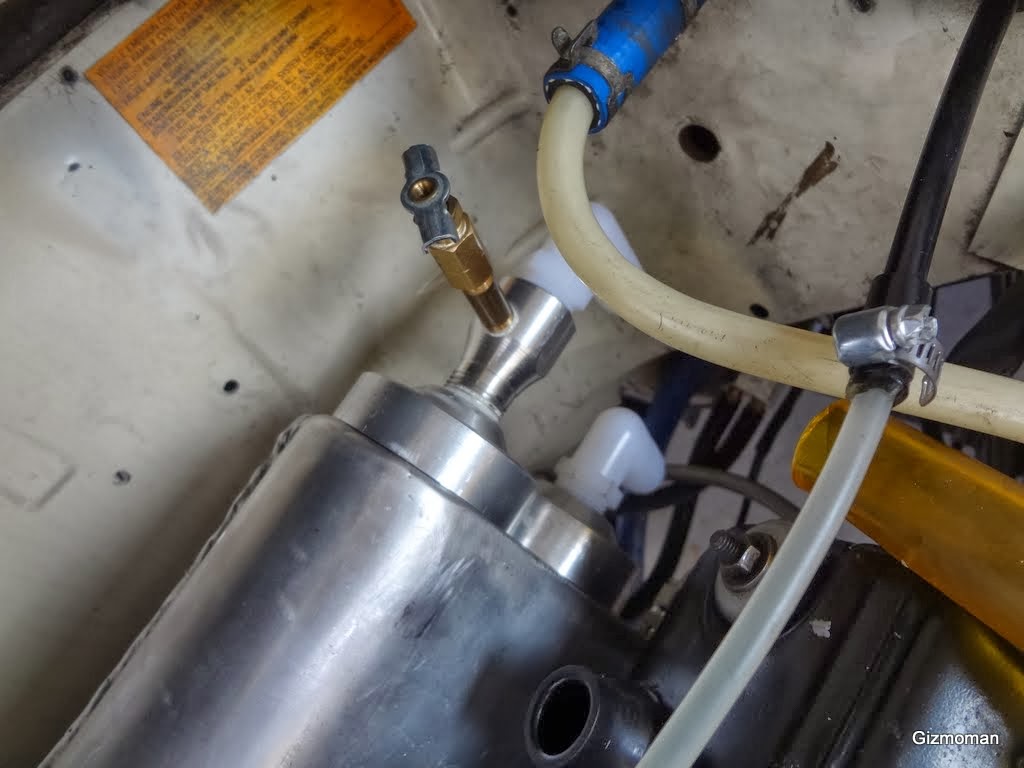
I was plumbing new 3/4" water lines for the WAIC and had to add two "T"s to feed the two cores, then two elbows to the "T's - looked pretty hacked up and took a lot of room. As I am waiting for new brass fittings (instead of using plastic ones only good for 200 F), I made two "Y" fittings instead. All the ports are 1/2" and should flow more than the pump can produce. The split should be pretty even as well.
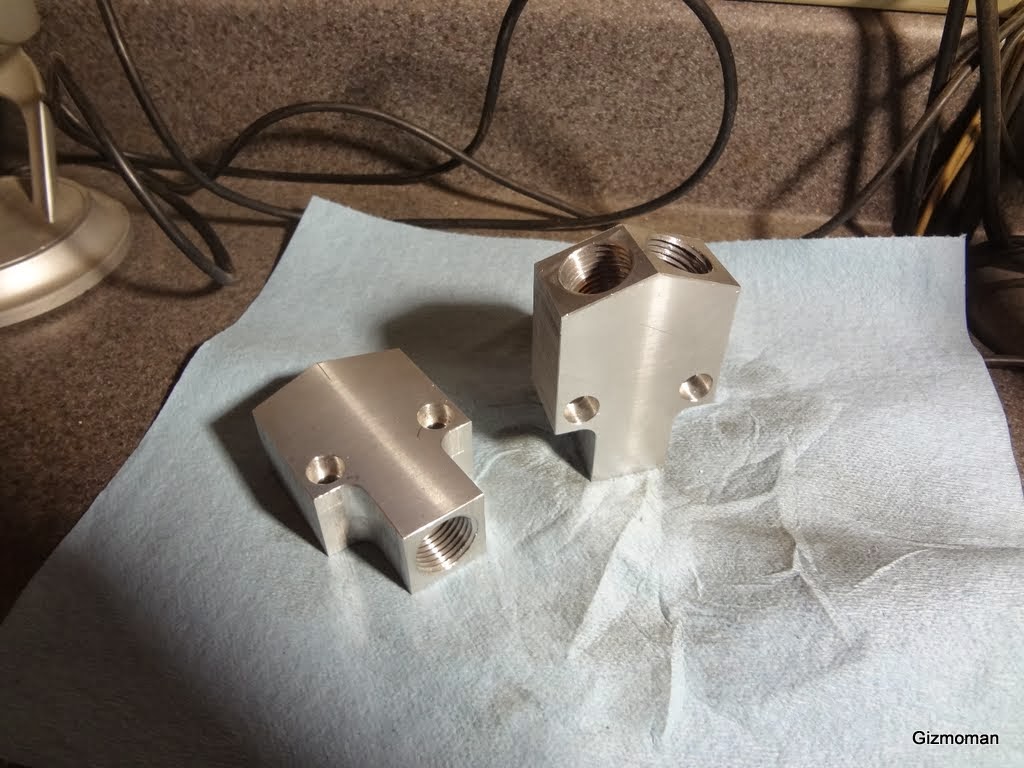
The fittings going in are 3/4 with two 5/8 fittings exiting.
Someday, I may actually get to drive this thing!