-
#30
by
RabbitJockey
on 25 Jan, 2011 18:40
-
yep i live in york
-
#31
by
RabbitJockey
on 25 Jan, 2011 19:08
-
boiling definitely helps, i'm not quite sure its worth the hassle, but to get them perfectly awesomely clean i think boiling them works well, the carbon comes off super easy after that, the baking soda helps but still takes work to get them off, if anyone has suggestions or wants to tell me something i am doing wrong please tell me
cook up a tasty snack

the water was black when this one was done

far left was the one i boiled, the rest were just soaked in baking soda, scrubbed with a brushed and cleaned with a tooth brushed, rubbed down all over with a rag, cleaned the ring lands out with a broken ring, i've been told thats a bad idea, but i did it anyway haha, the still need a bit more

tops, i think i will go over these a bit more

here is a nick i noticed, not quite sure what i am going to do about it

ring lands of the boiled piston, definitely better than the others

ring land of one i didn't boil, pretty good but could be better

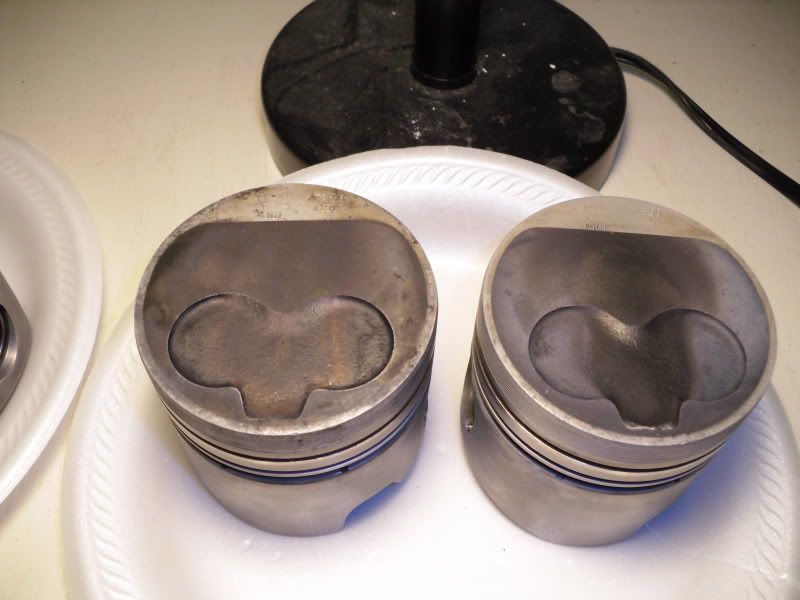
piston on the left is from cylinder #3, on the right is #4 to compare, cylinder 3 is the one where the head cracked, u can see the injection pattern deal is wider and the carbon didn't come off that side so well
-
#32
by
RabbitJockey
on 27 Jan, 2011 20:32
-
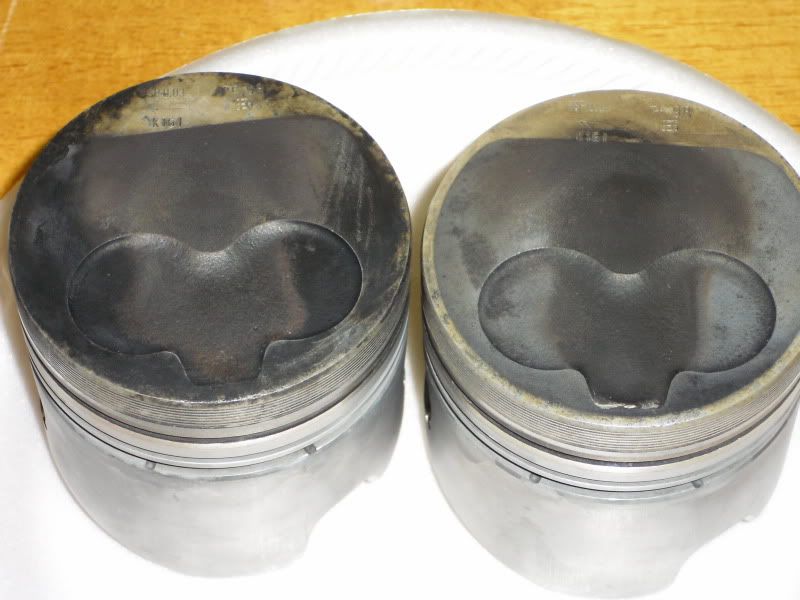
so i left them sit with baking soda paste on them again, then cleaned them all over with the tooth brush again, they're starting to look almost new, i'm gonna do this again and they will look almost new by then, you can really see the difference much better on cylinder 3 where the spray pattern is much wider, and a lot more discolored and turned kind of blue, so its obvious that it was much much hotter in that cylinder
-
#33
by
Rabbit TD
on 29 Jan, 2011 00:07
-
On valves and piston tops most people just use a wire wheel on a bench grinder. Try your piston boiling thing and then your broken ring or groove cleaner for the grooves. Hell I've actualy seen people use hacksaw blades before but I imagine it put some extra clearance wheree it wasn't wanted. Don't use the wire wheel in the grooves either, just the tops. I'd be lost without that wheel to clean things.
-
#34
by
theman53
on 29 Jan, 2011 06:09
-
If it is a standard piston for 1.6 *not reading again sorry* I have my set of 4 if that knick bothers you too much

-
#35
by
RabbitJockey
on 29 Jan, 2011 06:20
-
On valves and piston tops most people just use a wire wheel on a bench grinder. Try your piston boiling thing and then your broken ring or groove cleaner for the grooves. Hell I've actualy seen people use hacksaw blades before but I imagine it put some extra clearance wheree it wasn't wanted. Don't use the wire wheel in the grooves either, just the tops. I'd be lost without that wheel to clean things.
yeah the valves didn't really get all that clean, the bottom did, but the top has some hard chunks on it, these pistons are 20 over
-
#36
by
RabbitJockey
on 31 Jan, 2011 15:42
-
-
#37
by
RabbitJockey
on 05 Feb, 2011 14:42
-
been working on porting here and there as i have time, just gasket matching and cleaning things up, i wanna try to take the harshness out of the turn in the exhaust ports but its hard to get in that angle
the set up

look how much the exhaust needs opened up holey moley
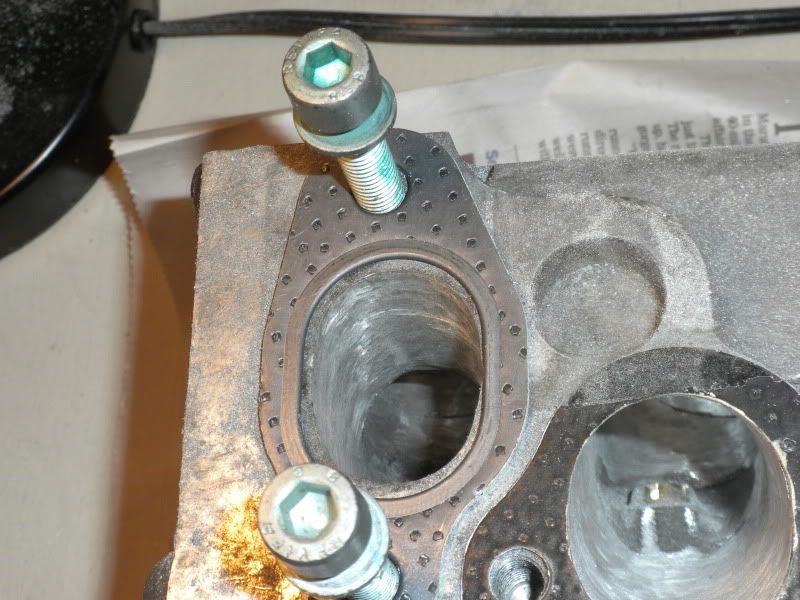
the intake and what i have done so far, just cleaned it all and smooth transitions i'm not gonna mess with the guide hump just run over it to resurface

stock intake

-
#38
by
RabbitJockey
on 06 Feb, 2011 15:14
-
while i was working on my daily i did a few things on the car itself. front poly bushings and coil overs, not lowered down or anything

-
#39
by
rabbitman
on 06 Feb, 2011 15:50
-
Looks good.
About how long did it take to port each runner?
What coilovers are you using?
-
#40
by
RabbitJockey
on 06 Feb, 2011 16:25
-
i only did 2 so far haha, takes a long time and you gotta be really really careful, you can't monkey around too much in the bowl area, i just cleaned everything up and gasket matched, i would say about an hour per port. maybe so people work faster, but i wasn't in a hurry i am trying to be carful u know. has weitec xs coil overs i believe, they are the fully adjustable ones. i bought them probably 6 years ago, been collecting dust since then.
-
#41
by
RabbitJockey
on 05 Aug, 2011 19:24
-
well, its been eons since i posted in here, i finally finished porting the head, and took it to the machine shop. When i ported the head, i gasket matched all the ports, and then sanded the whole way down the ports to remove all the casting marks, and to resurface everything down the port. around the valve seat you make the aluminum part of the port all match the valve seat, and then again do the same thing, resurface everything and clean up any boogers or casting marks. on the exhaust ports i tried to remove how harsh the turn is. the guy at the machine shop said it looked good, but they could have done it much more quickly haha, and they have a machine that opens up the valve seat area.
anyways porting really can make a big difference, just by examining the area, lets say u have a 25mm port that is a perfect circle. you then have an area of 491mm squared. so lets say gasket matching adds .5mm all the way around and u now have a 26mm port. and yes i probably removed a tleast a mm to gasket match the exhaust ports. so a 26 mm port would have an area of 531mm squared. thats an increase of the area of flow of nearly 10%. theres a million other factors when it comes to how much a head can flow, but its a perfect example of how such a minor difference can increase the flow rate of the head in a significant way.
more updates as i progress, assuming that i continue to progress haha
-
#42
by
jb86
on 07 Aug, 2011 19:45
-
i read thru the posts on boiling in baking soda and h2o
i fly r/c airplanes.
ive read on r/c forums about cleaning the engines
im not sure the exact steps
but i think it was use an old crock pot, set on low or some other setting
full with anti freeze
over night
the parts come out clean
very clean
in the morning.
i went to rcuniverse. typed in search - antifreeze clean.
http://www.rcuniverse.com/forum/m_326599/anchors_326599/mpage_1/key_/anchor/tm.htm#326599this may help
jon
-
#43
by
RabbitJockey
on 07 Aug, 2011 20:03
-
haha i was reading where it said put the whole engine in the crock pot, i was thinking wtf, then i remembered rc plane. thats an interesting idea to try, honestly boiling the pistons hardly did ***, letting them sit covered in backing soda paste worked quite well tho, took a couple days but only maybe an hours worth of work total.
-
#44
by
Mark(The Miser)UK
on 08 Aug, 2011 01:03
-
I wouldn't worry about that nick down by the oil ring, too far down to matter much, but mark it with a spot of felt tip, and avoid aligning middle ring gap with it to be sure.