Author Topic: Jetta project 200  (Read 178848 times)

Reply #90December 14, 2008, 12:44:30 pm

TurboJ

  • Veteran

  • Offline
  • ***

  • 661
Jetta project 200
« Reply #90 on: December 14, 2008, 12:44:30 pm »
OK, here's some update of my car's progress (finally !)

I have still been tackling with bodywork repairs.
When all the patching and welding seemed to be done, I found a couple of new holes and rotten areas, so no choice but to keep working.
My original schedule has streched a bit because the bodywork has given me a few time consuming surprises, but it should, at last, be done soon.

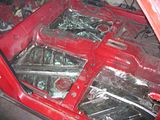
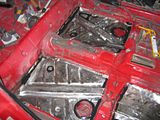
The final repairs are scheduled for this week, and today I prepared the inner floor for painting. The factory bitumen had cracked badly and let moisture under it, so it all had to come off. Only one real hole on the whole floor! Probably the only nice surprise about the whole bodywork... :roll:


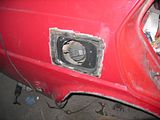
When I checked the condition of the tank filler surround, my finger went right through the sheet metal.... And it was really difficult to source a repair section. Also with the welding it went slightly wrong as the metal around the patch warped slightly - and yes, we were being extra careful with cooling it etc. Well, it's patched up now.


Also, I wanted to upgrade my CL interior to GTI / GTX specification.
The stock seats don't hold anyone in place during cornering :)
Problem was, GTX Jettas are extremely rare in Finland, and so I couldn't find a complete interior anywhere. I went on and bought a '89 Golf GTI 4-door interior, and decided to make that fit.
It sounds simple - you just have to make new upper mounts for the rear seatback, otherways it's bolt-on. In practice it took quite a bit of measuring and test fitting though. Upper mounts from a Golf were modified and welded onto the Jetta body.
Now, at last, the Recaro set will fit!


There's still plenty of work to be done before I can take the car to the paint job, but I know once the new coat of paint gleams on the Jetta's surface, I just know my motivation will go up in spades and fitting all the parts back to the car is going to be a bliss! And Aki, we have to discuss that body strenghtening too.. The braces have been ordered 8)
---------------------------------------
Jetta II 1.6 TD 'Project 200'

Reply #91December 14, 2008, 01:38:57 pm

rallydiesel

  • Veteran

  • Offline
  • ***

  • 1880
Jetta project 200
« Reply #91 on: December 14, 2008, 01:38:57 pm »
So did you end up reinforcing all the seams?
2006 Jetta TDI - gtb1749v, Malone 2, Frank's Titan 2 cam, VR6 clutch....
1991 Jetta TD - sold :(
2001 Golf TDI - Son's
1981 Rabbit - BEW tdi swap project

"ONCE YOU GO CLACK, YOU NEVER GO BACK"

Reply #92December 14, 2008, 01:44:36 pm

TurboJ

  • Veteran

  • Offline
  • ***

  • 661
Jetta project 200
« Reply #92 on: December 14, 2008, 01:44:36 pm »
Quote from: "rallydiesel"
So did you end up reinforcing all the seams?


I'm thinking about it. It's also a question of time.. We'll see what happens!
---------------------------------------
Jetta II 1.6 TD 'Project 200'

Reply #93December 14, 2008, 04:09:36 pm

Typrus

  • Junior

  • Offline
  • **

  • 93
Jetta project 200
« Reply #93 on: December 14, 2008, 04:09:36 pm »
Oooohhh... This should be cool.
Finding a way to have a really tall pentagonally hemispherical (I assume thats the shape of it anyway, if its anything like Toyota's 20v 4-cyls) piston that still has a swirl bowl in it... Sweet. Don't want to inject the diesel right through the piston crown lol.
That could turn out really awesome. Or have a really freaky failure. lol.

You should stitch up the body. Not only will it help out with absorbing the power, but your body flex in cornering and manuevering will be cut down as well. Much more sure-footed!
1995 Toyota Camry 2.2L 5-speed
1984 Toyota Tercel 4wd Wagon 1986 "           "           "      "    
1996 VW Passat TDI 1Z w/ KermaTDI Stage 3 kit
1999.5 F-250 7.3L Powerstroke
2002 Excursion 7.3L Powerstroke (Dads)

Reply #94December 19, 2008, 10:30:13 pm

Aki-76

  • Guest
Jetta project 200
« Reply #94 on: December 19, 2008, 10:30:13 pm »
old pictures from finish "ffp" topic

http://www.ffp.fi/bb/viewtopic.php?t=87801

Reply #95December 20, 2008, 04:11:28 am

stewardc

  • Guest
Jetta project 200
« Reply #95 on: December 20, 2008, 04:11:28 am »
Finish the floor in truck bedliner. It really works and is a sound deadener also.

Reply #96December 20, 2008, 08:02:05 am

TurboJ

  • Veteran

  • Offline
  • ***

  • 661
Jetta project 200
« Reply #96 on: December 20, 2008, 08:02:05 am »
Quote from: "stewardc"
Finish the floor in truck bedliner. It really works and is a sound deadener also.


I have already painted it, no chance that could be applied on top of the paint?
---------------------------------------
Jetta II 1.6 TD 'Project 200'

Reply #97December 20, 2008, 08:45:23 am

stewardc

  • Guest
Jetta project 200
« Reply #97 on: December 20, 2008, 08:45:23 am »
I think it can as long as you rough it up. I put it in the trunk of my new Toyota, and all I did was a quick wipe with a sanding pad, then degreaser.

Reply #98December 22, 2008, 07:03:44 pm

rallydiesel

  • Veteran

  • Offline
  • ***

  • 1880
Jetta project 200
« Reply #98 on: December 22, 2008, 07:03:44 pm »
What are you doing with the transmission to handle the power?
2006 Jetta TDI - gtb1749v, Malone 2, Frank's Titan 2 cam, VR6 clutch....
1991 Jetta TD - sold :(
2001 Golf TDI - Son's
1981 Rabbit - BEW tdi swap project

"ONCE YOU GO CLACK, YOU NEVER GO BACK"

Reply #99December 22, 2008, 07:49:17 pm

TurboJ

  • Veteran

  • Offline
  • ***

  • 661
Jetta project 200
« Reply #99 on: December 22, 2008, 07:49:17 pm »
I'm hoping the combination of a big turbo and an aggressive camshaft will make it a 'revver' and limit the low-down torque - I'll see if the stock tranny will keep in one piece. If not, I'll strip a Passat for a 02A.
---------------------------------------
Jetta II 1.6 TD 'Project 200'

Reply #100December 28, 2008, 07:47:02 am

TurboJ

  • Veteran

  • Offline
  • ***

  • 661
Jetta project 200
« Reply #100 on: December 28, 2008, 07:47:02 am »
Some updates again:

I have been painting the floor:

The driver's floor piece will have to wait until I get all the wires sorted out and the steering column refitted. I'm expecting a few little holes may be found down there...
I have decided to use only normal paint in finishing the floor pieces and leave out any bitumen. I will then only put factory-style noise-suppressing carpets on the painted floor. They can just be lifted off as there is no glue or anything. I decided to do this because when the floor rusts through the next time, it will be much quicker and easier to repair than with bitumen.


I finally got the front struts out. As you know, in typical VW fashion, a special tool is needed to undo the strut's top nuts. And the style of the special tool even cahnged during the production run of the mk2 Golfs/Jettas... The '91 Jetta requires a 22 mm socket with an opening on its side. Naturally the tools is NLA at the VW dealership, so I just had to make one myself.

You need a long 22mm socket, and then use an angle grider to make the opening. A 6mm hex-head key will have to fit through the opening. With most long sockets, there's only so much room to grind material off for the opening, so you may need to shorten the hex-head key too, as I did.


My total re-arrangement of engine room ancillaries meant I had to give up the idea of using a factory air box. So I ended up buying a second-hand BMC Carbon Dynamic Airbox (CDA). I hope it is as durable as the manufacturer claims. I'll see what the cotton fabric looks like after I have washed it thoroughly. Anyway, the idea behind this air box's design is that it's a normal cold-air system, but with a carbon-fibre air box. Heat suppression should be first class, and now I get to choose where I take the cold-air feed from.


I dismantled all the wires forward of the firewall:

Much of the original wiring was in pretty bad shape and many individual wires were almost broken in two, so I'm going to replace the whole lot.
I'm also going to fit a kind of 'master plug' so that when I take off my engine the next time, I'll only have to open one connector instead of dozen little connectors all around the engine compartment. While I'm doing this, I also got the change to get rid of some of the unnecessery wires, such as the fog light and turbo cooling thermoswitch wires. Which is good.


...the wires as they were removed from the car.
On the next picture, I have separated all the wires and they are now ready to be used as a model for the completely new harness that I will be making next.
---------------------------------------
Jetta II 1.6 TD 'Project 200'

Reply #101December 30, 2008, 02:16:18 pm

TurboJ

  • Veteran

  • Offline
  • ***

  • 661
Jetta project 200
« Reply #101 on: December 30, 2008, 02:16:18 pm »
Hey, anybody have a wiring diagram for a mk2 diesel?

EDIT: Thanks to mr. Vincent Waldon who helped me to a suitable wiring diagram!

But there is still a question:

This thingy was bolted onto the firewall in the engine compartment.
It's been many months since I took it all apart and unfortunately I failed to mark one or two wires...  :oops:

So I'm assuming the 'thingy' in the picture is the glow plug fuse.
One of the thick wires should then go to the glow plugs, but  the other thick wire was clearly connected to battery plus feed! There'd have to be a relay of some sort in there somewhere?
Furthermore, what is the function of the three small wires? They seem to go to the fuse box. Maybe it could be a combined fuse / relay box and the three small wires would control the relay circuit...?

Any help would be appreciated! It's all a bit frustrating since there is one other nameless wire in there that could also have something to do with the glow plugs...
---------------------------------------
Jetta II 1.6 TD 'Project 200'

Reply #102December 30, 2008, 07:17:50 pm

TurboJ

  • Veteran

  • Offline
  • ***

  • 661
Jetta project 200
« Reply #102 on: December 30, 2008, 07:17:50 pm »
bump for updated info on my last question...
---------------------------------------
Jetta II 1.6 TD 'Project 200'

Reply #103December 31, 2008, 01:31:59 am

1outof5

  • Guest
Jetta project 200
« Reply #103 on: December 31, 2008, 01:31:59 am »
if it can wait 'till tonight I'll get a picture of the wiring. My one is not at the house.

Reply #104December 31, 2008, 03:52:15 am

TurboJ

  • Veteran

  • Offline
  • ***

  • 661
Jetta project 200
« Reply #104 on: December 31, 2008, 03:52:15 am »
Sure, thanks mate!
---------------------------------------
Jetta II 1.6 TD 'Project 200'