Author Topic: How to perform a voltage drop test  (Read 32749 times)

December 01, 2009, 01:16:36 pm

burn_your_money

  • Global Moderator
  • Veteran

  • Offline
  • ****

  • 8999
  • Personal Text
    Bright, On
How to perform a voltage drop test
« on: December 01, 2009, 01:16:36 pm »
Below I am going to explain how to properly perform a voltage drop test on your car.

A voltage drop test is a way of measuring the health of wires and connections in an electrical circuit. It is especially useful when troubleshooting hard or no start problems. The test should be performed on a yearly basis, preferably before the cold winter months.

The reason why you can't use the ohm setting on your multimeter to determine the health of a connection or wire is because the connection or wire will not be under any load. The thinnest wire you can imagine would show virtually 0 resistance but it would not be able to carry the amperage required to turn your engine over.

The most important thing to remember when performing a voltage drop test is that you do not want the engine to start. Luckily this is as easy as unplugging the stop solenoid on the injection pump.

TOOLS REQUIRED
  • Digital Voltmeter or Multimeter
  • A helper
  • Battery Charger

Your helper won't need to do anything more then crank the engine over using the key in the ignition. No prior experience is required :)

Here is a diagram that I stole and modified in Paint. You can see that I have numbered the key connections (1 to 6) that we will be focusing on. You can click on the image for a larger view.  


Step 1 Disconnect the stop solenoid


Step 2 Set parking brake and put transmission in nuetral.

Step 3 Turn your multimeter on and set it to DC 20 V (or whatever option is closest but greater then 12V on your multimeter)

Step 4 Place one of the leads from the multimeter on the positive battery post (Location #3) (please excuse my poor excuse for a multimeter lead)
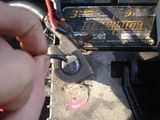


Step 5 Place the other lead from the multimeter on the starter stud (Location #2)
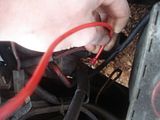

Please note that it is important to make sure that you have a good connection between the location you are checking and the end of your multimeter lead

Step 6 Instruct your helper to crank the engine over until you tell them to stop.

Step 7 While the engine is cranking over take a reading from your multimeter


Here you can see that I have a reading of 0.89V. What this means is that between the two ends of my multimeter leads (Location #2 and Location #3) 0.89V are being wasted. They are being converted into waste heat energy. Anything over 0.5V is considered excessive but I prefer a maximum voltage drop of 0.1V. What we need to do now is to determine exactly where those volts are being wasted. In this portion of the circuit (between the multimeter leads) there are 3 things we need to check. First is the connection at location # 3, the battery post. Second would be the wire that runs from locaton # 3 to Location #2. The final connection to test will be at the starter post, Location #2.

Step 8 Tell your helper to stop cranking.

Step 9 Tell your helper to stop cranking.

Step 10 Throw something at your helper and tell them to stop cranking.

Now we are going to find out exactly where these volts are being wasted

Step 11 Place one of the leads from the multimeter on the positive battery post (Location #3)


Step 12 Place the other lead from the multimeter on the clamp around the battery post (Again, please excuse the leads on my multimeter)
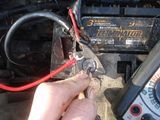

Step 13 Instruct your helper to crank the engine over until you tell them to stop.

Step 14 While the engine is cranking over take a reading from your multimeter
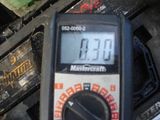

Ah ha! A loss of 0.3 volts. The connections around the battery terminals should have a voltage drop of 0.0 volts. Remove the connector from the battery post and clean both the battery post and the connector. Tighten the connector back up and repeat steps 11 through 14 until you are satisfied with the voltage drop.


We now have taken care of 0.3 volts of the original 0.89 volts that we measured. Now check the wire between the battery and starter (Location #3 and Location #2). Remember to place your multimeter leads on the ends of the wire and not on the battery post or starter stud. Finally, measure the voltage drop at the Starter stud connection. One lead will be on the stud, the other on the connection around the stud. The total voltage drop from the 3 locations should add up to the 0.89 volts that we got in step #7


Perform the same tests on the ground side.

In order to test the alternator portion of the system (location #1 to Location #2) the engine needs to be running with the alternator charging. The charging of the battery will place the load on the wire. Cranking the starter over is not necessary (or recommended). It is best to do this test last because the battery will be discharged and the alternator will be working near capacity to recharge the battery.

Quote from: Tinker Toy
2.  It might be helpful to keep headlights on bright and the heater fan on high when checking alternator charging circuit voltage drops as battery charging current can otherwise taper off soon and even then, the current may be a moving target.

I also like to test to make sure that the alternator mount is not causing a voltage drop. Again with the alternator charging put one multimeter lead on the casing of the alternator and the other lead on the engine block. You are looking for 0.0 volts. If you do have a voltage drop I found that the simpliest solution is to run a ground strap from the alternator to the engine block.

When checking the ground for the starter remember to test from the starter housing (the flange that bolts to the transmission) to the end of the ground cable. MK1 folks will probably notice a good sized drop here.

If you do find that your battery cables need to be replaced MK3 battery cables make an excellent replacement. They are abunbant in the junkyards and have terminals built into the tops of them for adding extra wires.

Remember to reconnect the stop solenoid when you are finished and to tell your helper to stop cranking. It's also a good idea to charge your battery with the battery charger.

Enjoy quicker and easier starts, better fuel mileage, and less wear and tear on your battery, starter and alternator.

Remember to keep your hands clear of the rad fan as well as the alternator belt. I like to unplug the rad fan while working in the engine bay if I am leaving the battery connected.
« Last Edit: December 04, 2009, 09:19:23 pm by burn_your_money »


Tyler

Reply #1December 01, 2009, 01:35:45 pm

burn_your_money

  • Global Moderator
  • Veteran

  • Offline
  • ****

  • 8999
  • Personal Text
    Bright, On
Re: How to perform a voltage drop test
« Reply #1 on: December 01, 2009, 01:35:45 pm »
Please let me know if this is helpful, confusing etc

Thanks :)
Tyler

Reply #2December 01, 2009, 01:56:06 pm

rabbitman

  • Veteran

  • Offline
  • ***

  • 2787
Re: How to perform a voltage drop test
« Reply #2 on: December 01, 2009, 01:56:06 pm »
Very good, I'm not an electrical wiz but that was easy to understand. ;D
'82 Rabbit, I put on a euro vnt-15, 2.25" DP, 2.5" exhaust, the result.....it whistled.

I removed the turbo, made a toilet bowl 2.5" DP, the result....it was deafening. Now it has a homemade muffler up front and a thrush in the rear, the result.....less loud.
Watch: AGENDA, GRINDING AMERICA DOWN

Reply #3December 01, 2009, 07:35:33 pm

the caveman

  • Veteran

  • Offline
  • ***

  • 1739
Re: How to perform a voltage drop test
« Reply #3 on: December 01, 2009, 07:35:33 pm »
I agree that doing a voltage drop test is the only proper way to check circuits. HOWEVER just today i finally solved a problem a good friend who now owns my 98 TDI jetta was having. He was having an intermittent slow/weird cranking / and starting issue. A couple of weeks ago it almost didn't crank. He said like a bad battery, which was not quite a year old. I checked it, tested 98% good. He noticed that his battery light was dimmed until he pulled away in the morning.Checked for charging, it was 12.5 v until the motor was revved once, then 13.90 v. A week later he came by ,same issue, but not so bad. Did a voltage drop from alternator to starter, from starter to battery-battery  ground to engine and trans. 0V drop from terminal to terminal. I wanted to clean up the big connection at the alternator ,noticed the connector for the tach and D circuit wasn't even connected !?! WTF, how could even have charged ?
 Anyways a week or 2 go by, still has the problem. I'm sure it's not the starter but we take booster cables from battery ground to the block- same thing. I tell him bring to the shop and i'll check and change the starter bushing if it's not one of the self supporting newer style, because since i bought the car 6 1/2 years ago the transmission or starter were never removed. Anyways he has the newer style with no bushing in the trans, so i just clean up the starter connections and the big ground at the bellhousing. Ta-da problem fixed ! But remember ALL my voltage drop tests showed nothing, plus. Not to say that the test isn't valid, it just that after almost 30 years of wrenching , the old saying holds up - the more i know, the less i know.
As another quick example- a few years ago i had a gasser golf come into the shop for a tune up. I drove it around the block to make sure there wasn't anything else to check  . Ran fine. Got it into the shop, opened the hood, the distributor cap wasn't even clipped on, the rotor was hitting the inside of the cap ?? how did the car even run, never mind no missing bucking etc -again WTF ?
" I'm a vegetarian,not because i love animals, it's because i hate plants"
1970 Type 3 fastback
1972 Renault 12
1971 Super Beetle 140 HP 159 ft lbs
1987 Fox
1989 TD Jetta
1990 Fox
1989 Fox
1998 TDI Jetta
1990 T3 German MIL Transporter 1.9 na Giles super pump
1997 Jetta GLX TDI

Reply #4December 01, 2009, 07:45:25 pm

the caveman

  • Veteran

  • Offline
  • ***

  • 1739
Re: How to perform a voltage drop test
« Reply #4 on: December 01, 2009, 07:45:25 pm »
I was taught to use up to 10% drop in voltage as a spec. Of course 0% is what you really want . Remember, one strand of wire can give zero resistance
" I'm a vegetarian,not because i love animals, it's because i hate plants"
1970 Type 3 fastback
1972 Renault 12
1971 Super Beetle 140 HP 159 ft lbs
1987 Fox
1989 TD Jetta
1990 Fox
1989 Fox
1998 TDI Jetta
1990 T3 German MIL Transporter 1.9 na Giles super pump
1997 Jetta GLX TDI

Reply #5December 01, 2009, 10:52:07 pm

macka

  • Veteran

  • Offline
  • ***

  • 957
Re: How to perform a voltage drop test
« Reply #5 on: December 01, 2009, 10:52:07 pm »
Good enough to go on Vince Waldons site  ;)
Quote from: Vincent Walden
I do know that I drive torque,  while listening to my friends prattle on about horsepower.

Reply #6December 02, 2009, 02:25:43 am

745 turbogreasel

  • Guest
Re: How to perform a voltage drop test
« Reply #6 on: December 02, 2009, 02:25:43 am »
Must be the season...

BTW I got new multimeter leads from Radio Shack for $7. 
By the time I was back in my truck, I'd already stabbed myself with one of those razor pointed B'tards!

Just the other day I had the 6.2 at the parts store setting up for a job.  It had been cranking a little slow the last few days, so I figure one or more batteries(I've had one longer than the truck) is getting ready to go.  I'll nip this in the bud I tell myself.
They bring out the battery tester, "This one is good,  So is the other."
OK, if yo say so, I tell myself, and hook up the batts again.
grrrrk  -No start.  Recheck all connections, and they're fine.  Starter pulls 400A, and only makes one RPM!
I felt like a bit of a dork bumming a ride home to get my spare, but  this is  what I kept it for.
I think it cranks so fast I could run without glow plugs now! 8)

Reply #7December 02, 2009, 08:03:16 am

1outof5

  • Guest
Re: How to perform a voltage drop test
« Reply #7 on: December 02, 2009, 08:03:16 am »
very good  8) sounds like a "big 3" enhancement is a good thing on our "old" vehicules

Reply #8December 04, 2009, 12:04:29 am

rabbitman

  • Veteran

  • Offline
  • ***

  • 2787
Re: How to perform a voltage drop test
« Reply #8 on: December 04, 2009, 12:04:29 am »
Burn, this post is causing me grief already ::).

I just checked the charging circuit and I'm losing .46v through the alternator mount and about the same on the positive side. So do I add those readings up to get about a .9 volt drop? Or will having a drop in the alt ground cause a drop on the positive side too?  I'm totally not an electrical guy so don't laugh too hard ;D

I really.....really don't want to run new wires to the battery.

I didn't check the starter for a voltage drop 'cause that takes two people.
'82 Rabbit, I put on a euro vnt-15, 2.25" DP, 2.5" exhaust, the result.....it whistled.

I removed the turbo, made a toilet bowl 2.5" DP, the result....it was deafening. Now it has a homemade muffler up front and a thrush in the rear, the result.....less loud.
Watch: AGENDA, GRINDING AMERICA DOWN

Reply #9December 04, 2009, 03:11:29 am

Op-Ivy

  • Veteran

  • Offline
  • ***

  • 514
Re: How to perform a voltage drop test
« Reply #9 on: December 04, 2009, 03:11:29 am »
Nice writeup Tyler!
1990 TD Jetta - 490,000Km

Reply #10December 04, 2009, 10:19:51 am

burn_your_money

  • Global Moderator
  • Veteran

  • Offline
  • ****

  • 8999
  • Personal Text
    Bright, On
Re: How to perform a voltage drop test
« Reply #10 on: December 04, 2009, 10:19:51 am »
I just checked the charging circuit and I'm losing .46v through the alternator mount and about the same on the positive side. So do I add those readings up to get about a .9 volt drop? Or will having a drop in the alt ground cause a drop on the positive side too?  I'm totally not an electrical guy so don't laugh too hard ;D

You have to think of the circuit as a loop. What you are doing is measuring the voltage drop between points in that loop. As long as the points you are measuring aren't overlapping then you add up the numbers you are getting and that is your voltage drop. From the sounds of it it does sound like you are losing 0.9v.

What I did on my mk2 was I just doubled up the wire between the alt and the starter. Since I have a lot of parts cars I just stole one off of there. You don't need to go out and buy expensive wire if you are doing this, even a regular 14 gauge wire (maybe) might solve your problem. I guess it will also depend on what style of harness your alternator has.

Here is what I did for the ground side.
http://img.photobucket.com/albums/v603/burnyourmoney/DSC08093.jpg
See the red wire between the alternator housing and the vacuum pump? I found that I no longer needed to rev the engine to 3000+ rpm for the alt/tach to kick in. 1100 will get it going.

Glad you guys are finding this useful :)
Tyler

Reply #11December 04, 2009, 10:38:57 pm

rabbitman

  • Veteran

  • Offline
  • ***

  • 2787
Re: How to perform a voltage drop test
« Reply #11 on: December 04, 2009, 10:38:57 pm »
A PURPLE IP!!!!! :o lol

I guess I can fix the alt ground easy enough, for the alt output mine has two thickish reds and a skinny blue(?) wire. So can I just run a fatter red wire to the battery or starter solenoid? Maybe this'll fix my pulsing/flickering lights too :D

Thanks :)
'82 Rabbit, I put on a euro vnt-15, 2.25" DP, 2.5" exhaust, the result.....it whistled.

I removed the turbo, made a toilet bowl 2.5" DP, the result....it was deafening. Now it has a homemade muffler up front and a thrush in the rear, the result.....less loud.
Watch: AGENDA, GRINDING AMERICA DOWN

Reply #12December 04, 2009, 10:49:33 pm

burn_your_money

  • Global Moderator
  • Veteran

  • Offline
  • ****

  • 8999
  • Personal Text
    Bright, On
Re: How to perform a voltage drop test
« Reply #12 on: December 04, 2009, 10:49:33 pm »
It's a long story....

Quote from: rabbitman
So can I just run a fatter red wire to the battery or starter solenoid

Yes
Tyler

Reply #13December 04, 2009, 11:17:28 pm

745 turbogreasel

  • Guest
Re: How to perform a voltage drop test
« Reply #13 on: December 04, 2009, 11:17:28 pm »
Wire doesn't usually gain resistance, so chances are you can narrow the loss down to one connector , either term to batt, or wire to term...
Cut the wire, pun on a fresh terminal, and be fine.
The alternator wanting its own case  ground wire is no surprise.