S-PAutomotive.com

Author Topic: Swapping 84 Cabby Wing Windows and Gaskets to 81 Rabbit, Can it be done?  (Read 8176 times)

November 02, 2011, 11:34:29 pm

ORCoaster

  • Moderator
  • Veteran

  • Offline
  • ***

  • 4390
  • Personal Text
    Restoring a Caddy as time and weather allows

Depends on how hard you want to work at it.


Yesterday was too nice to sit in the office and knowing that the rain was about to begin again, yes it is doing it now, I took the day off to determine if the advice on this forum was good, bad or just foggy.  Many said yes, but it had been a while since they did a swap.  
I should re-read my question and the discussion because I think we concentrated on exchanging the rubber gaskets and what I really wanted to do was change out both the wing windows and the gaskets.  

When I had my windshield replaced last summer the guy there told me he never had success with gluing the original hinges back to the windows and getting them to stay.  Just to much torque and weird mounting surfaces.  He said go find those bolt on type windows and I would be glad I did.  

Well last week I purchased two doors just for the windows alone.  I was able to remove the drivers side window and entire frame out of the door and brought it back home with me.  I then took the one out of the Rabbit and started looking them over.  

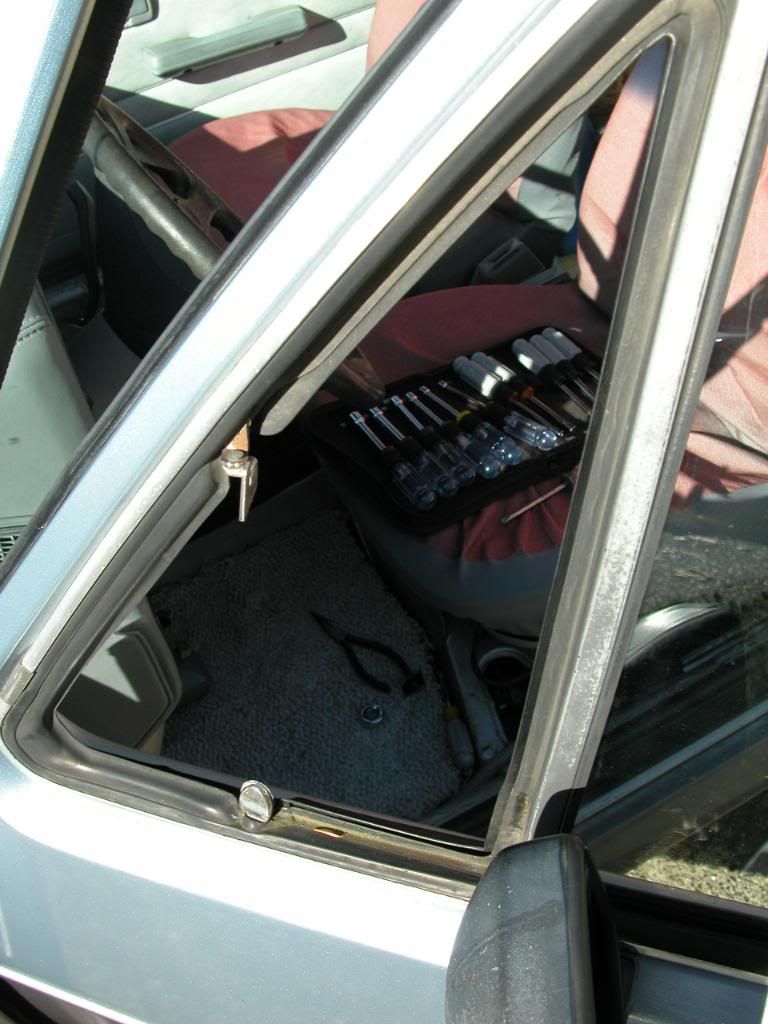
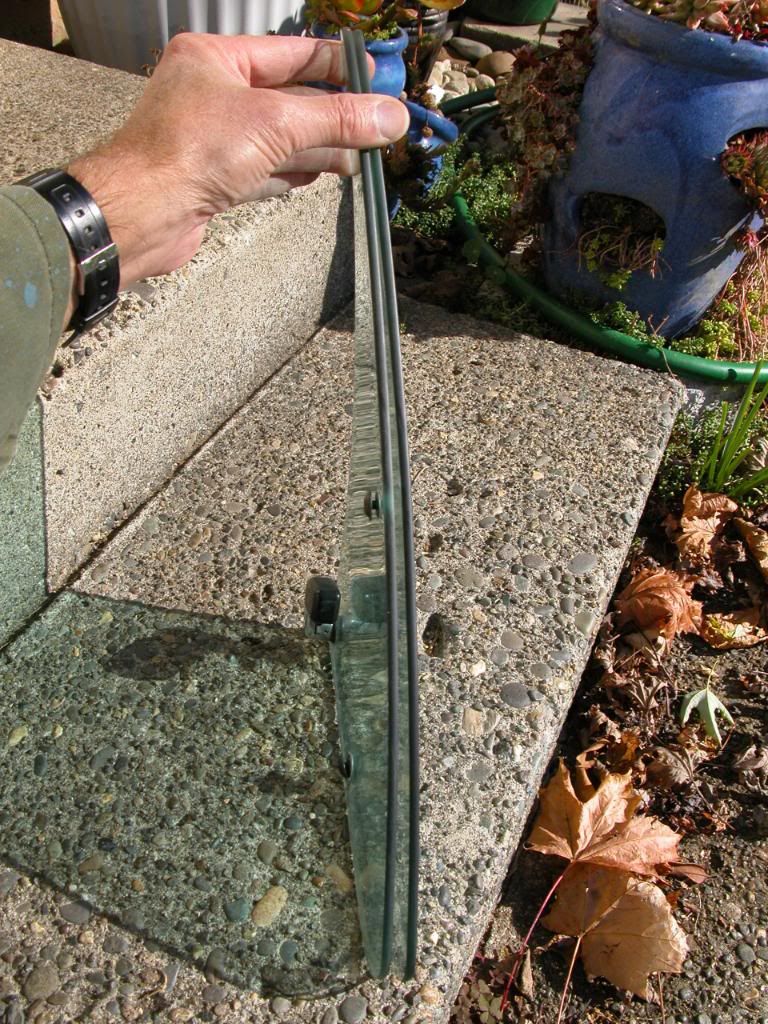
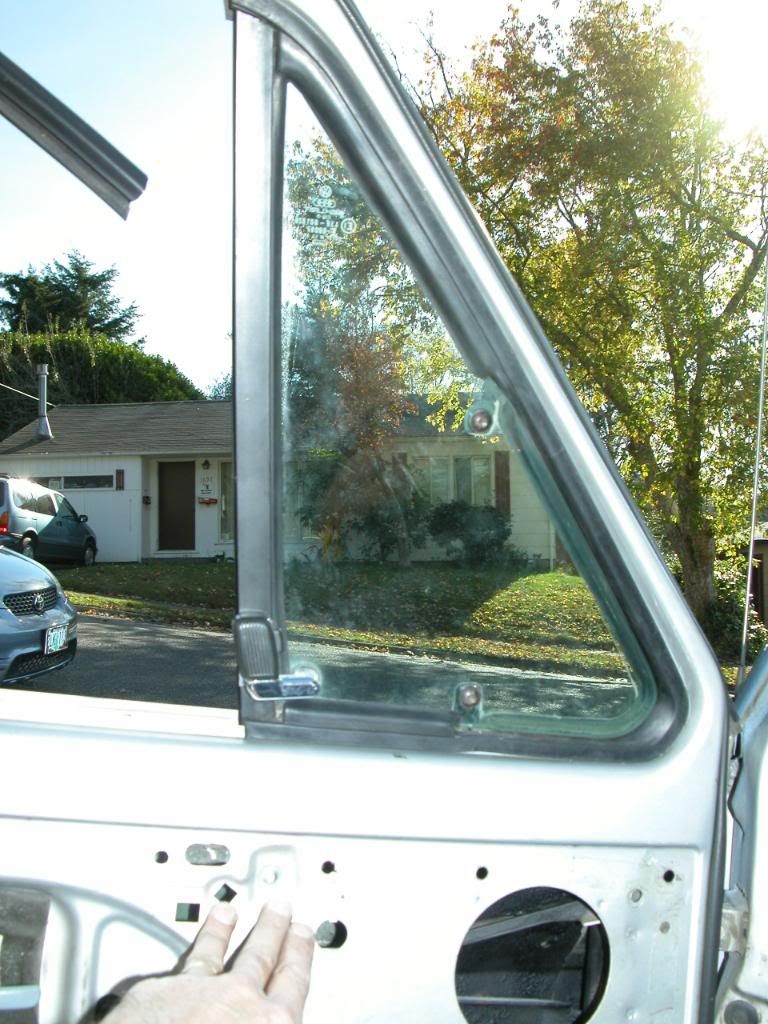
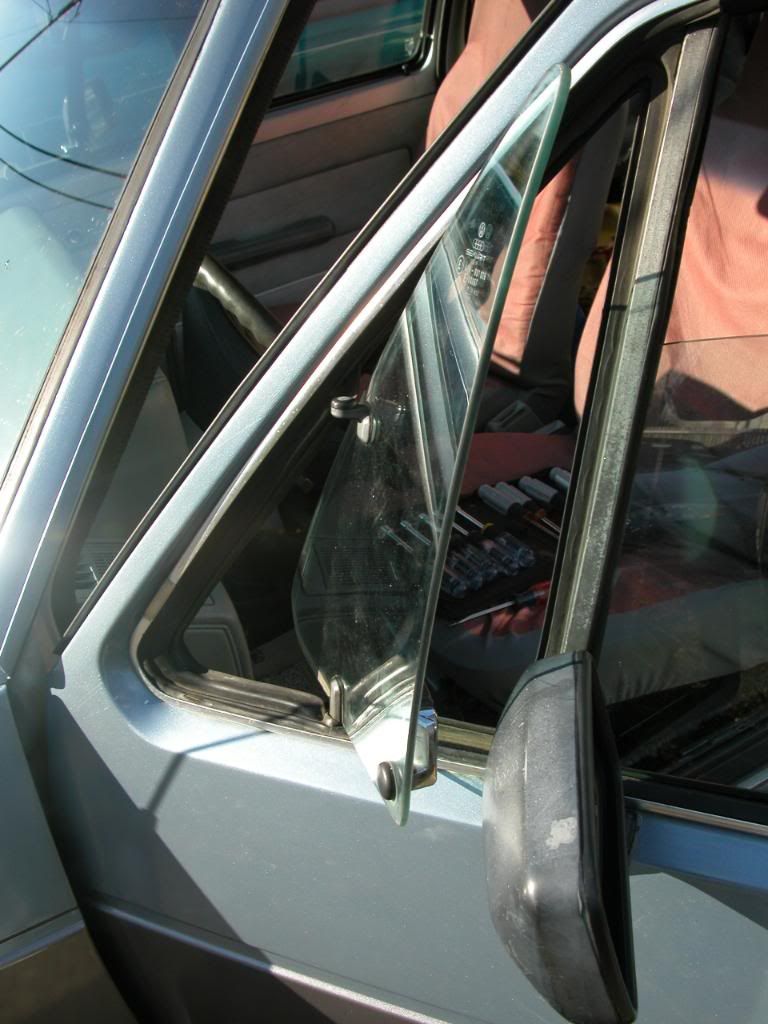
Just to prove and show the process I started with removing the Rabbit window out of it's spot.  Note the hinges, flat and chrome.


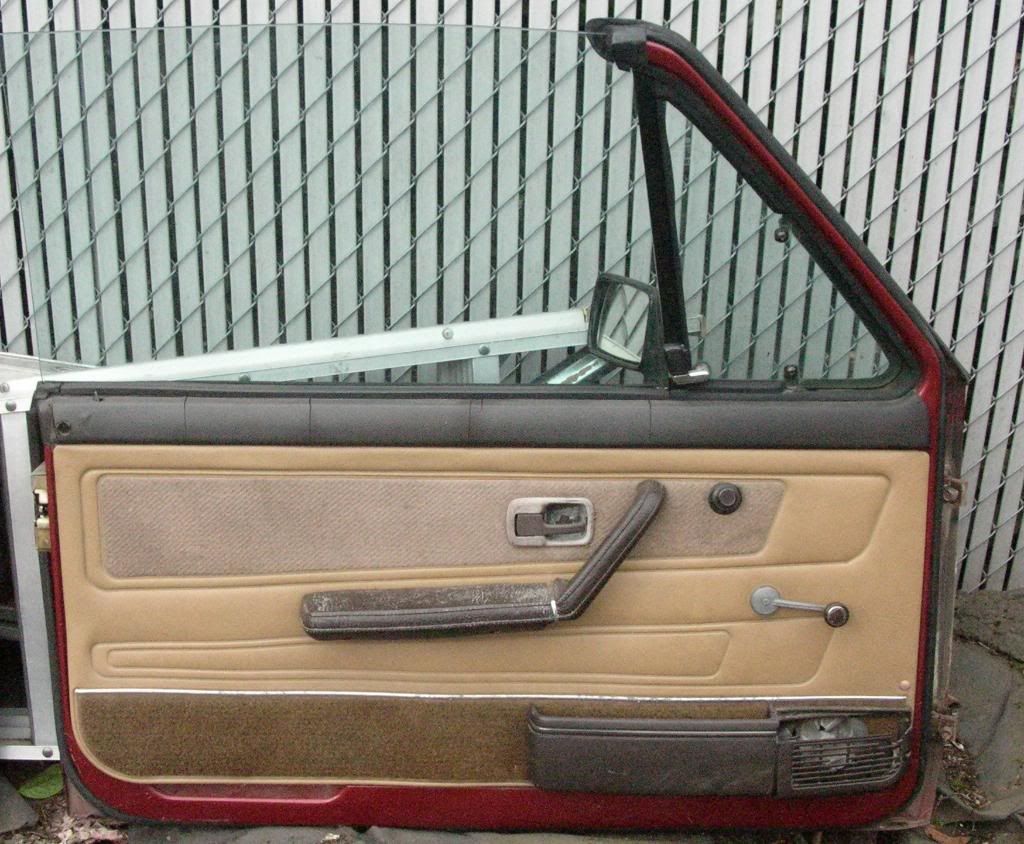
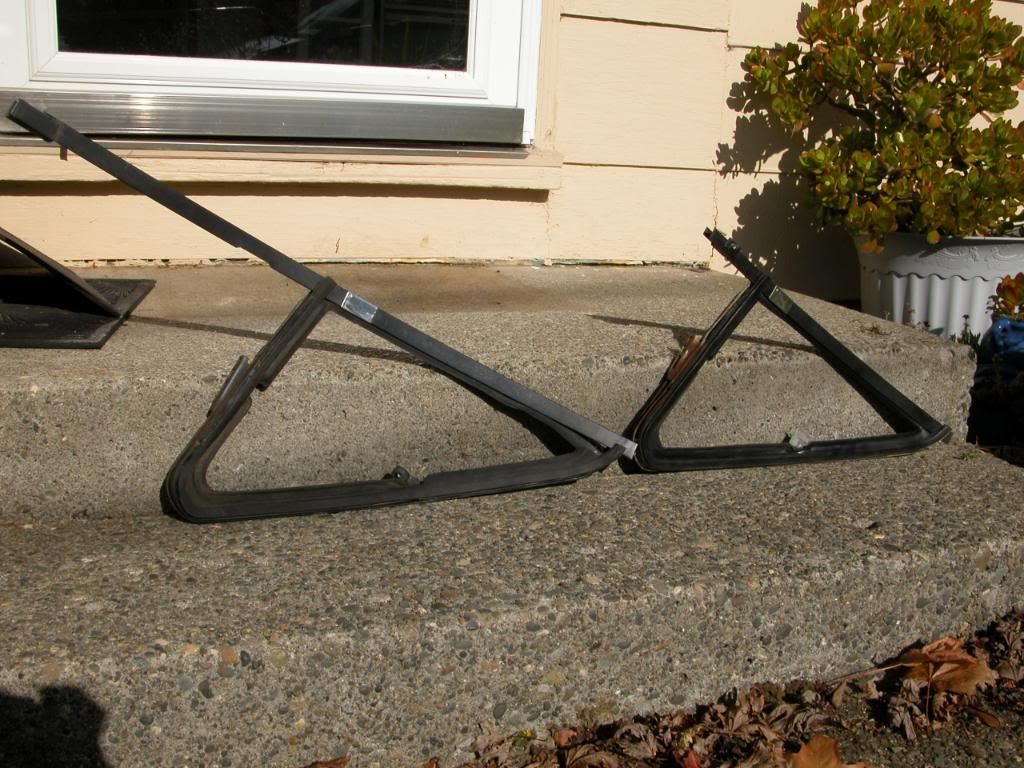
And the donor door.  Anyone need to Cabby doors?


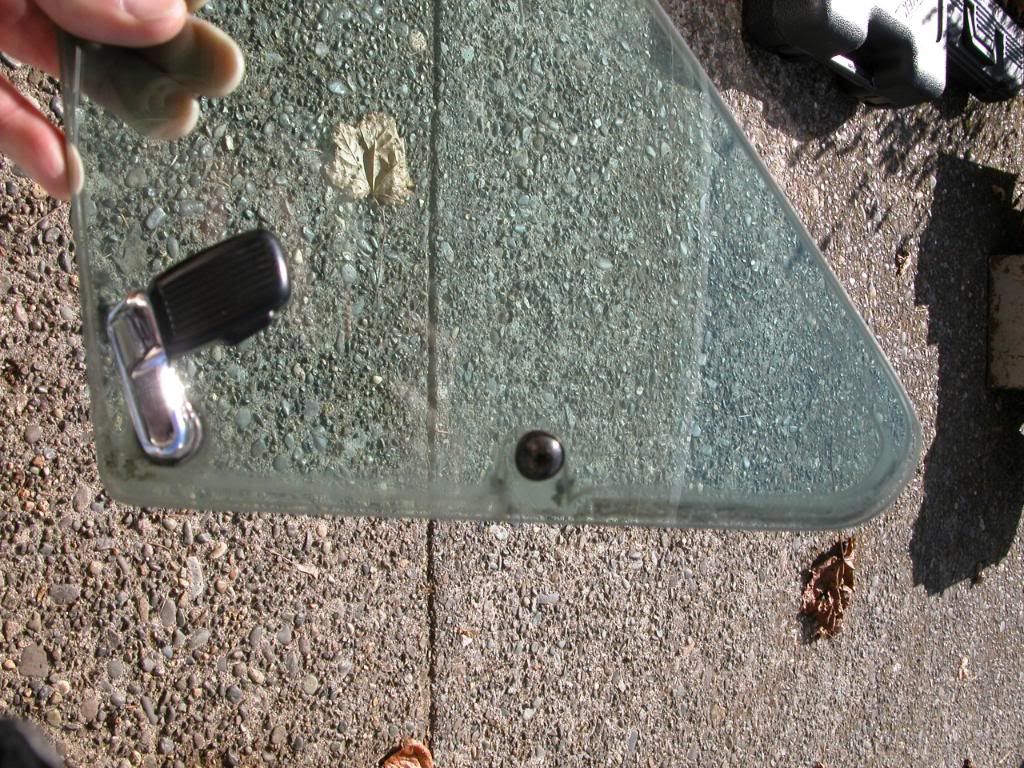
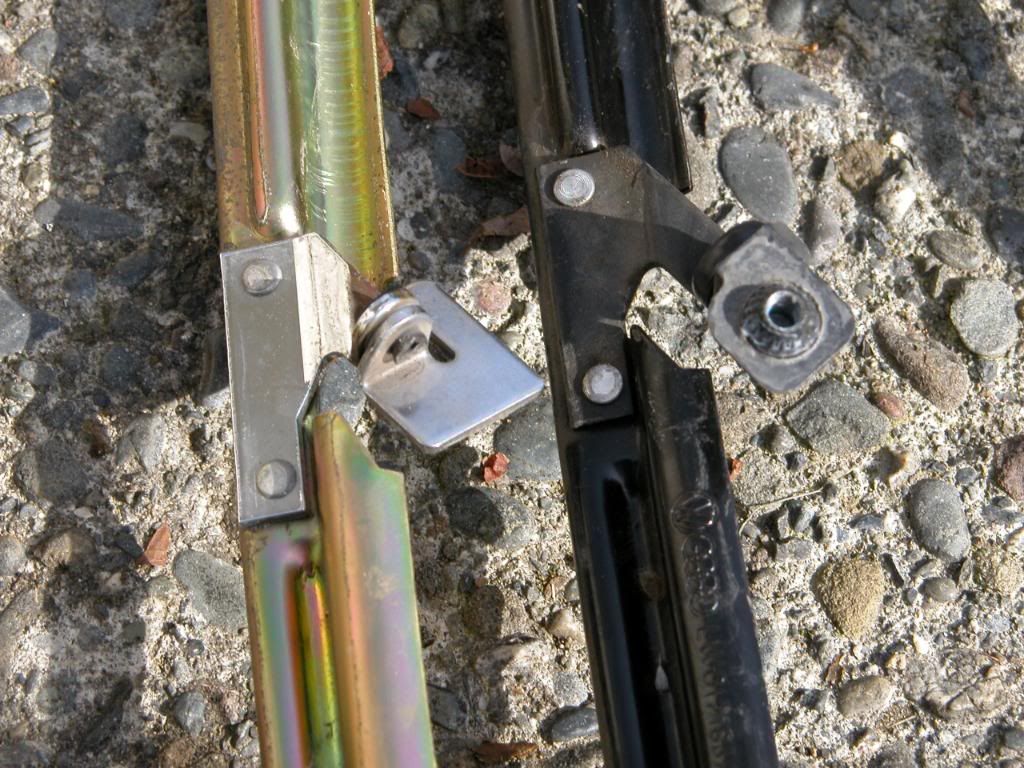
Once I had the windows out side by side I noted no differences in size. Height, width and curvature, all the same.  Only differences were the handles and the bolt holes.


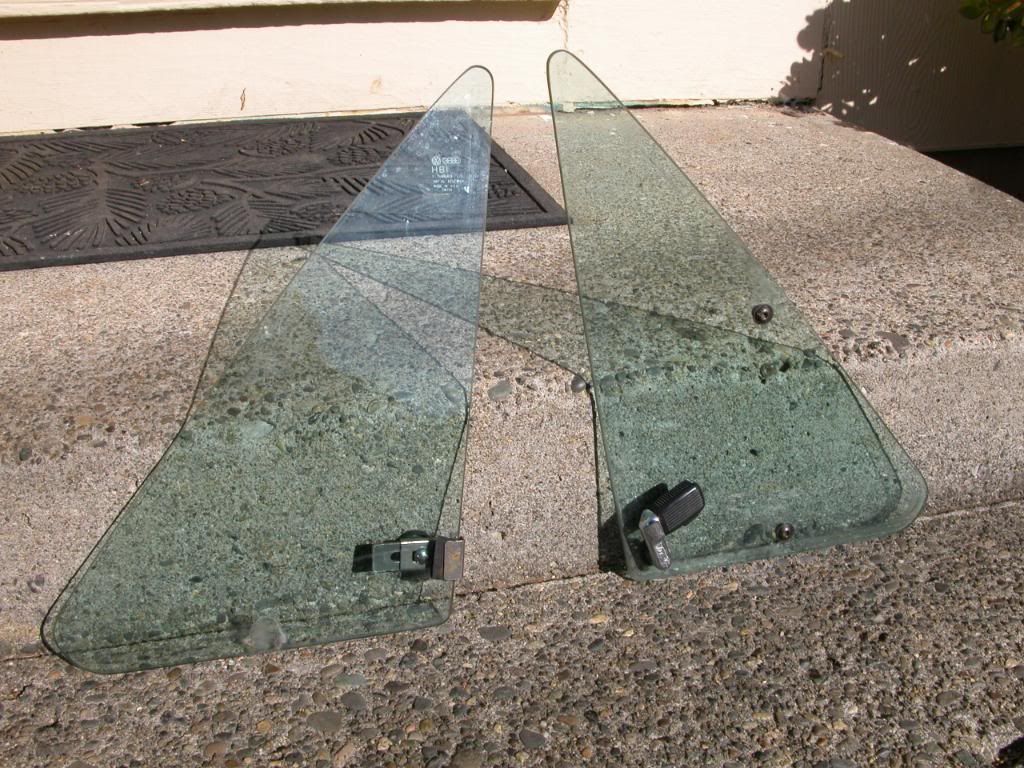
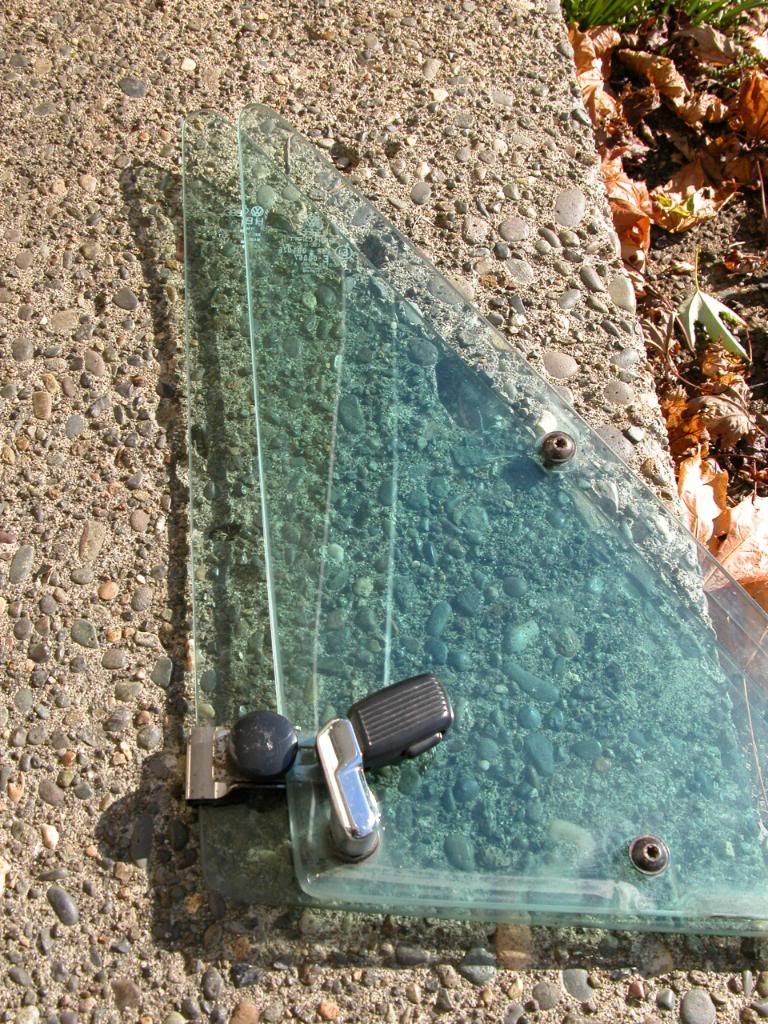
I did note that the gaskets were pretty much the same and only the opening where the upper hinge came through to the window was just a wee bit wider than the original one.  So those would be a direct swap.

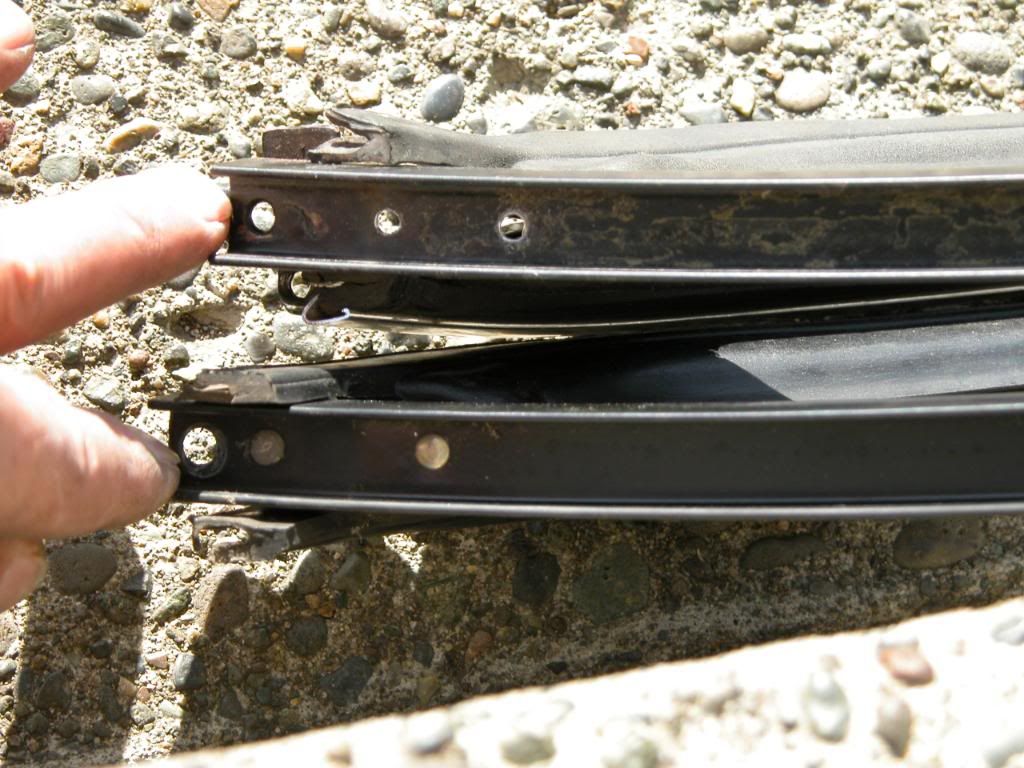
The real problem is the channel that goes up and down the inside of the door and holds the main window in place is way different.  

The Cabby is larger than the earlier Rabbit


The means of keeping the track in at the top is different and so are the spacings for the metal bracket that goes around the front of the wing window and holds the rubber gasket.


I figured I was out of luck on this one.  I didn't want to remove the metal channels and have to rivet them in new places.  But that is how the upper hinge attaches and that is needed to make this work.  So I started to investigate just removing and reattaching that hinge.   Woooo hooo a direct swap again.  


I drilled the rivets off each and reattached the needed hinge to the old frame.  


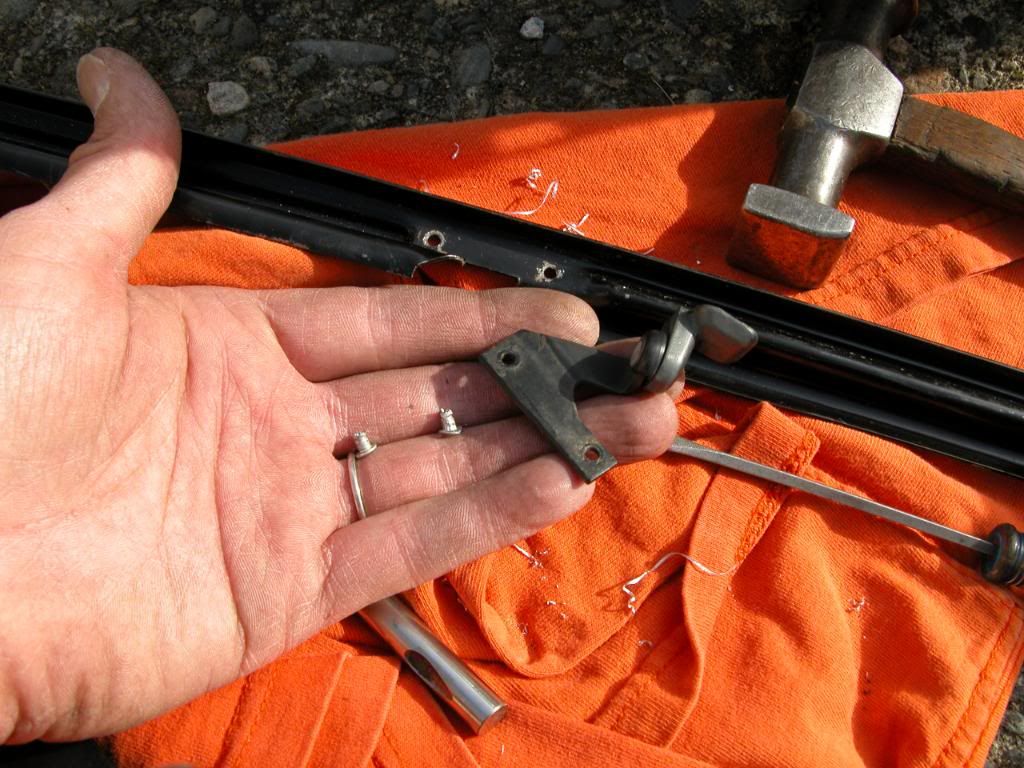
I was then able to slip the donor gaskets on the original frame and not have to change any of that hardware.  It slid in with just a few pokes of a thin screw driver guiding the gaskets to where they needed to be.  Then I popped in a new rivet at the bottom of the channel and installed the wing window.  


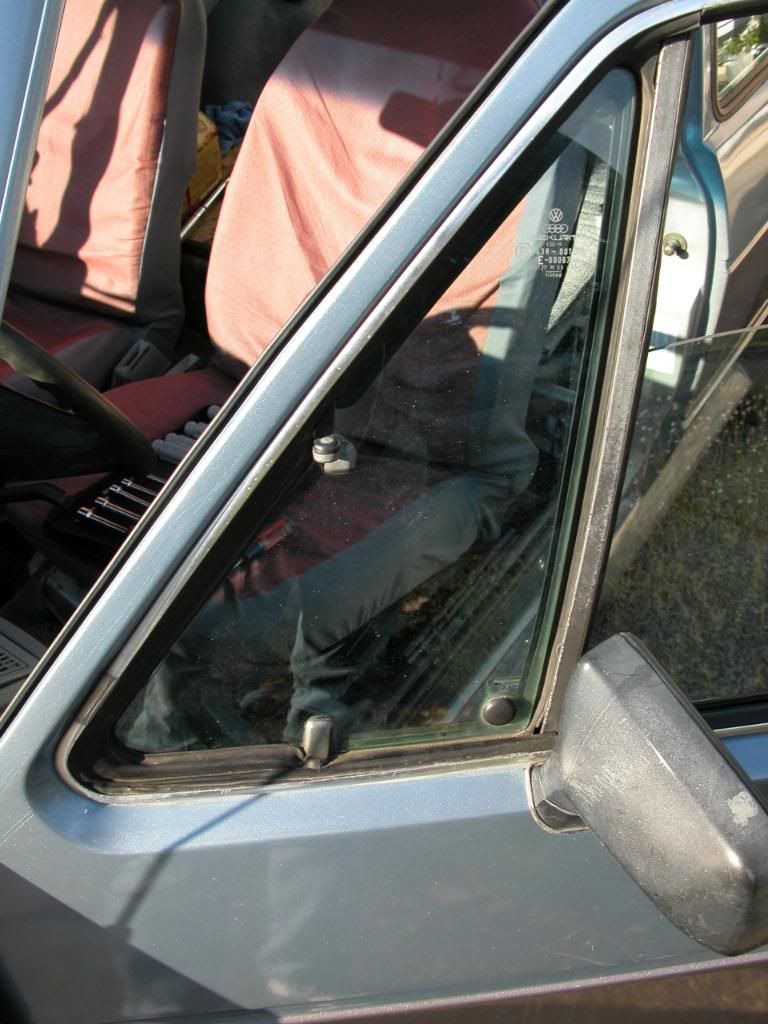
See all done,  and yes they do work.


I took all kinds of pictures on this so if you need to see more let me know and I will add if I can answer the question better that way.

Thanks for all the advice on this.  I didn't think I was going to see success on this when I was checking out the frames but with a sharp drill and mind I got it to go.

Now to take on the other side.  

As for the chrome strips around the windows, I used my originals guys.  I didn't bring the Cabby because it doesn't curve at the end and is too long.  Getting them off is easy but not so putting them back on.  And getting the gasket into that slot is kind of a pain in the thumbs, made it work with a small flat screwdriver it can be done, just takes time.  

So I got my goal complete.  Wing windows that don't leak and more importantly that they open and close properly.  

Yeee Hawww.
« Last Edit: November 03, 2011, 08:09:40 pm by ORCoaster »


Reply #1November 05, 2011, 03:34:08 pm

R.O.R-2.0

  • Veteran

  • Offline
  • ***

  • 7335
  • Personal Text
    Pacific Northwest - Oregon - USA
Re: Swapping 84 Cabby Wing Windows and Gaskets to 81 Rabbit, Can it be done?
« Reply #1 on: November 05, 2011, 03:34:08 pm »
i love owning an '84 rabbit.. the 1 year of mk1.5

if you really pay attention, and really pay attention to the 84's, they are considerably different in many area.

my 84 shares lots of characteristics of both the mk1 platform, but there are also many aspects of it that are identical, or very close to mk2.

84 was kinda a 1 off year. no bounce away bumpers, there was a bumper filler piece between the grille, there were plastic inner fenders, bolt in wing windows, 3 bolt sun visors, and im sure im forgetting things..
92 Jetta GLI - Black, 1.6D w/ GT2056V turbo..
86 GTI - 4 Door, Med Twilight Gray, Tow Machine..
86 Audi Coupe GT - Tornado Red, All Stock.. WRECKED.
89 Toyota 4Runner - Dark Grey Metallic, LIFTED!

Turbo: exhaust gasses go into the turbocharger and spin it, witchcraft happens and you go faster.

Reply #2November 06, 2011, 12:19:05 pm

Toby

  • Veteran

  • Offline
  • ***

  • 728
Re: Swapping 84 Cabby Wing Windows and Gaskets to 81 Rabbit, Can it be done?
« Reply #2 on: November 06, 2011, 12:19:05 pm »
I thought all of these differences were between US and German built Rabbits.

BTW, if you find yourself a bottle of hydraulic brake assembly fluid it makes fast work of assembling any kind of rubber parts. It is VERY slippery. You can stretch a radiator hose over a spigot that is larger than the OD of the hose if you work at it.  It can be hard to find, but no one should ever assemble a wheel cylinder or caliper w/o it. DOT 3 and up has no inherent lubricity, (unlike older castor bean based brake fluid) and will grind the rubber bits up in about a 1/4 of their normal life. The assembly lube cures this and provides a moisture barrier as well. One bottle will last a lifetime as long as you don't lose it.

Reply #3November 07, 2011, 04:06:49 pm

ORCoaster

  • Moderator
  • Veteran

  • Offline
  • ***

  • 4390
  • Personal Text
    Restoring a Caddy as time and weather allows
Re: Swapping 84 Cabby Wing Windows and Gaskets to 81 Rabbit, Can it be done?
« Reply #3 on: November 07, 2011, 04:06:49 pm »
Well now that may be the case.  I don't know what nationallity the donor car was.  It could have very well been a German car.  Note sure. 

Still was nice it worked out and on my way up north yesterday I passed several places were there were old road kill making a huge stink across the road and it was great to be able to pop open that wing and not have to endure the smell any longer than necessary.

Good for getting dampness out of the car as well.  No more cloudy/foggy windows.  I suppose that is what the defroster is for right?

Reply #4November 08, 2011, 02:55:13 am

Toby

  • Veteran

  • Offline
  • ***

  • 728
Re: Swapping 84 Cabby Wing Windows and Gaskets to 81 Rabbit, Can it be done?
« Reply #4 on: November 08, 2011, 02:55:13 am »
It pretty easy to tell the difference. Look at the fuse block. US made Rabbits do not have the stupid, failure prone, plug in fuse block and like almost all American cars, have few electrical problems unless kidf%$ked

Reply #5November 10, 2011, 01:00:28 pm

BigVWman

  • Veteran

  • Offline
  • ***

  • 332
Re: Swapping 84 Cabby Wing Windows and Gaskets to 81 Rabbit, Can it be done?
« Reply #5 on: November 10, 2011, 01:00:28 pm »
ALL mk1 cabriolets are german built!
Tim
83 rabbit shell 92 cabby tdi conversion, 91 cabby aba conversion, 87 cabby,  87 gti,  01nb tdi new project,00 1.8t nb, 98 ranger,92 f150 flareside(its pink) 97 cabrio and a 00 cabrio!

Reply #6November 11, 2011, 12:10:32 am

ORCoaster

  • Moderator
  • Veteran

  • Offline
  • ***

  • 4390
  • Personal Text
    Restoring a Caddy as time and weather allows
Re: Swapping 84 Cabby Wing Windows and Gaskets to 81 Rabbit, Can it be done?
« Reply #6 on: November 11, 2011, 12:10:32 am »
Then there we are.  I went to the mans place and he had all these Cabby parts about.  I think I saw the electrical stuff there in box 34 but passed it by to get to the doors leaning on the fence.  Lots of parts, but no body to put them on.  Not sure how or why he kept them so long.  But the 1948 Jeep under the canopy gave me some indication he liked to collect things.

I am going to try and swap the other side out tomorrow if it doesn't rain on me.  Then I can slide in the new carpet and not fear it getting soaked.

Reply #7July 09, 2013, 07:46:12 pm

Laserface

  • Newbie

  • Offline
  • *

  • 12
I know this an old post...

How did you attach the new hinge to the old frame? The OEM fasteners (rivets?) are flush. Replacement rivets would poke through, and it seems they would protrude enough to cause fitment issues with the seal.

Reply #8July 10, 2013, 12:42:35 am

ORCoaster

  • Moderator
  • Veteran

  • Offline
  • ***

  • 4390
  • Personal Text
    Restoring a Caddy as time and weather allows
Yes old thread but you know what?  I finally got the passenger window done last weekend.  So This is great timing.   If you scroll down the pictures you will come to the two frames side by side with the hinges showing.  What I had to do is drill the rivets off both frames and swap the bolt on one for the glue on one.  That is due to the use of the same old frame but with new window glass and hinges.  I also pulled the gaskets off the donor bolt on frame and put it on the original one.  Only because they were in much better shape.  I didn't use the donor frame as it extends down the door farther and didn't want to fool with it.  I just put another pop rivet in the door part that holds the shorter frame in place and then put the screw in the top of the track.  Way up high you almost have to get at the middle of the window level to see it.  Oh yeah, the donor frames had this extra part on the top and I didn't want to have to grind it down to get the ears off to make it fit.  Another reason to use original frames. 

If you use a smaller pop rivet there are no fitment issues.  Did I answer all the questions. 

I found both of those aftermarket handles I mentioned in the other thread you have going.  But I think you said you have handles that are good.  ???


Reply #9July 11, 2013, 02:52:20 am

Laserface

  • Newbie

  • Offline
  • *

  • 12
I still have no handles for my glue in vent windows. I found some of the non opening "vent" windows from a Cabby. I thought I would use them to keep the rain out at least, but decided I wouldn't be happy with the non opening. So I kept digging and finally found a set of the bolt in style vent windows I had my heart set on. But like the ones you had, they are on the Cabby frames. I'll just swap the hinges onto my frame.

I was just worried about the rivets holding the new hinges in place. I'll give this a go tomorrow.

Reply #10July 11, 2013, 08:29:01 pm

Laserface

  • Newbie

  • Offline
  • *

  • 12
I went the opposite route and installed the passenger side first. Swapping the hinges over was easy, but getting the window back in place was a pain. Lots of poking to get the seal back all the right places.

The driver side is going to be a horrible experience though. The donor seals just split when i tired to remove them, so I'll have to reuse my seals (which feel amazing for 32 year old rubber). The issue with the driver side is that there is probably a whole tube of silicone holding the seal the frame and window. So i'll have to peel all that off. Yay me!

Reply #11July 11, 2013, 11:19:17 pm

ORCoaster

  • Moderator
  • Veteran

  • Offline
  • ***

  • 4390
  • Personal Text
    Restoring a Caddy as time and weather allows
Perhaps a little soapy water in small amounts will get things to slide better.  I didn't have any problem but was working in humid conditions at mid  60's temp.  Yay coastal weather.  I didn't remove the chrome trim on the window the second time either.  Since the winbedow was out first I was able to easy the frame and rubber gasket out with little trouble.  Window went in last as well, that way I could manhandle the frame all I wanted without fear of breaking the ever precious wing window with the magic holes.

Good luck. 


S-PAutomotive.com